Revisiting my first ever intro
on Sun Sep 27 2020 by Ingo HinterdingI found a box of floppies in my parent's attic and they contain some of the first program's I've ever written. This is probably my earliest attempt at writing a demo.
My first love: the Commodore 16
My first ever computer was a Commodore 16, I bought it 1986 from a friend and absolutely loved that machine. If you are in for some nostagia and my unhealthy affection for the C16 game Ghost Town, you can read about it here: ghosttown-story. I even ported the game to the C64, which I have written about here: ghosttown64.
My second love: the Commodore 128D
My second computer however was a Commodore 128D and I account it’s powerful BASIC 7.0 for why I loved programming so much and still do today. Creating sprites and moving them on the screen is just a matter of a few simple commands. For example, enter sprdef and a sprite editor opens that is quite usable:
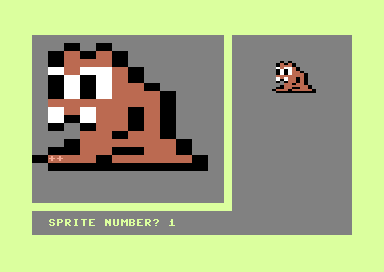
I have no idea who that little creep is, but it took me about a minute to create him with the C128 sprite editor. I was always impressed by the cracktros of the various scene groups, which showed what the machines were capable of in terms of graphics and sound. I wanted to create my own cracktros and demos, but I wasn’t experienced enough in 6502 assembly to really pull it off, so I used BASIC. On the C64, this would be close to impossible with the limitations of BASIC 2.0 (or a PEEK & POKE hell), but with BASIC 7.0 on the C128 a lot could be achieved.
I was amazed to find my first programs in a box on my parent’s attic. I wasn’t sure what was on them or if the disks worked at all, but to my surpise, a lot of my old code loaded without any issues. 5.25″ floppies turn out to be more reliable than CD-ROMs after all!
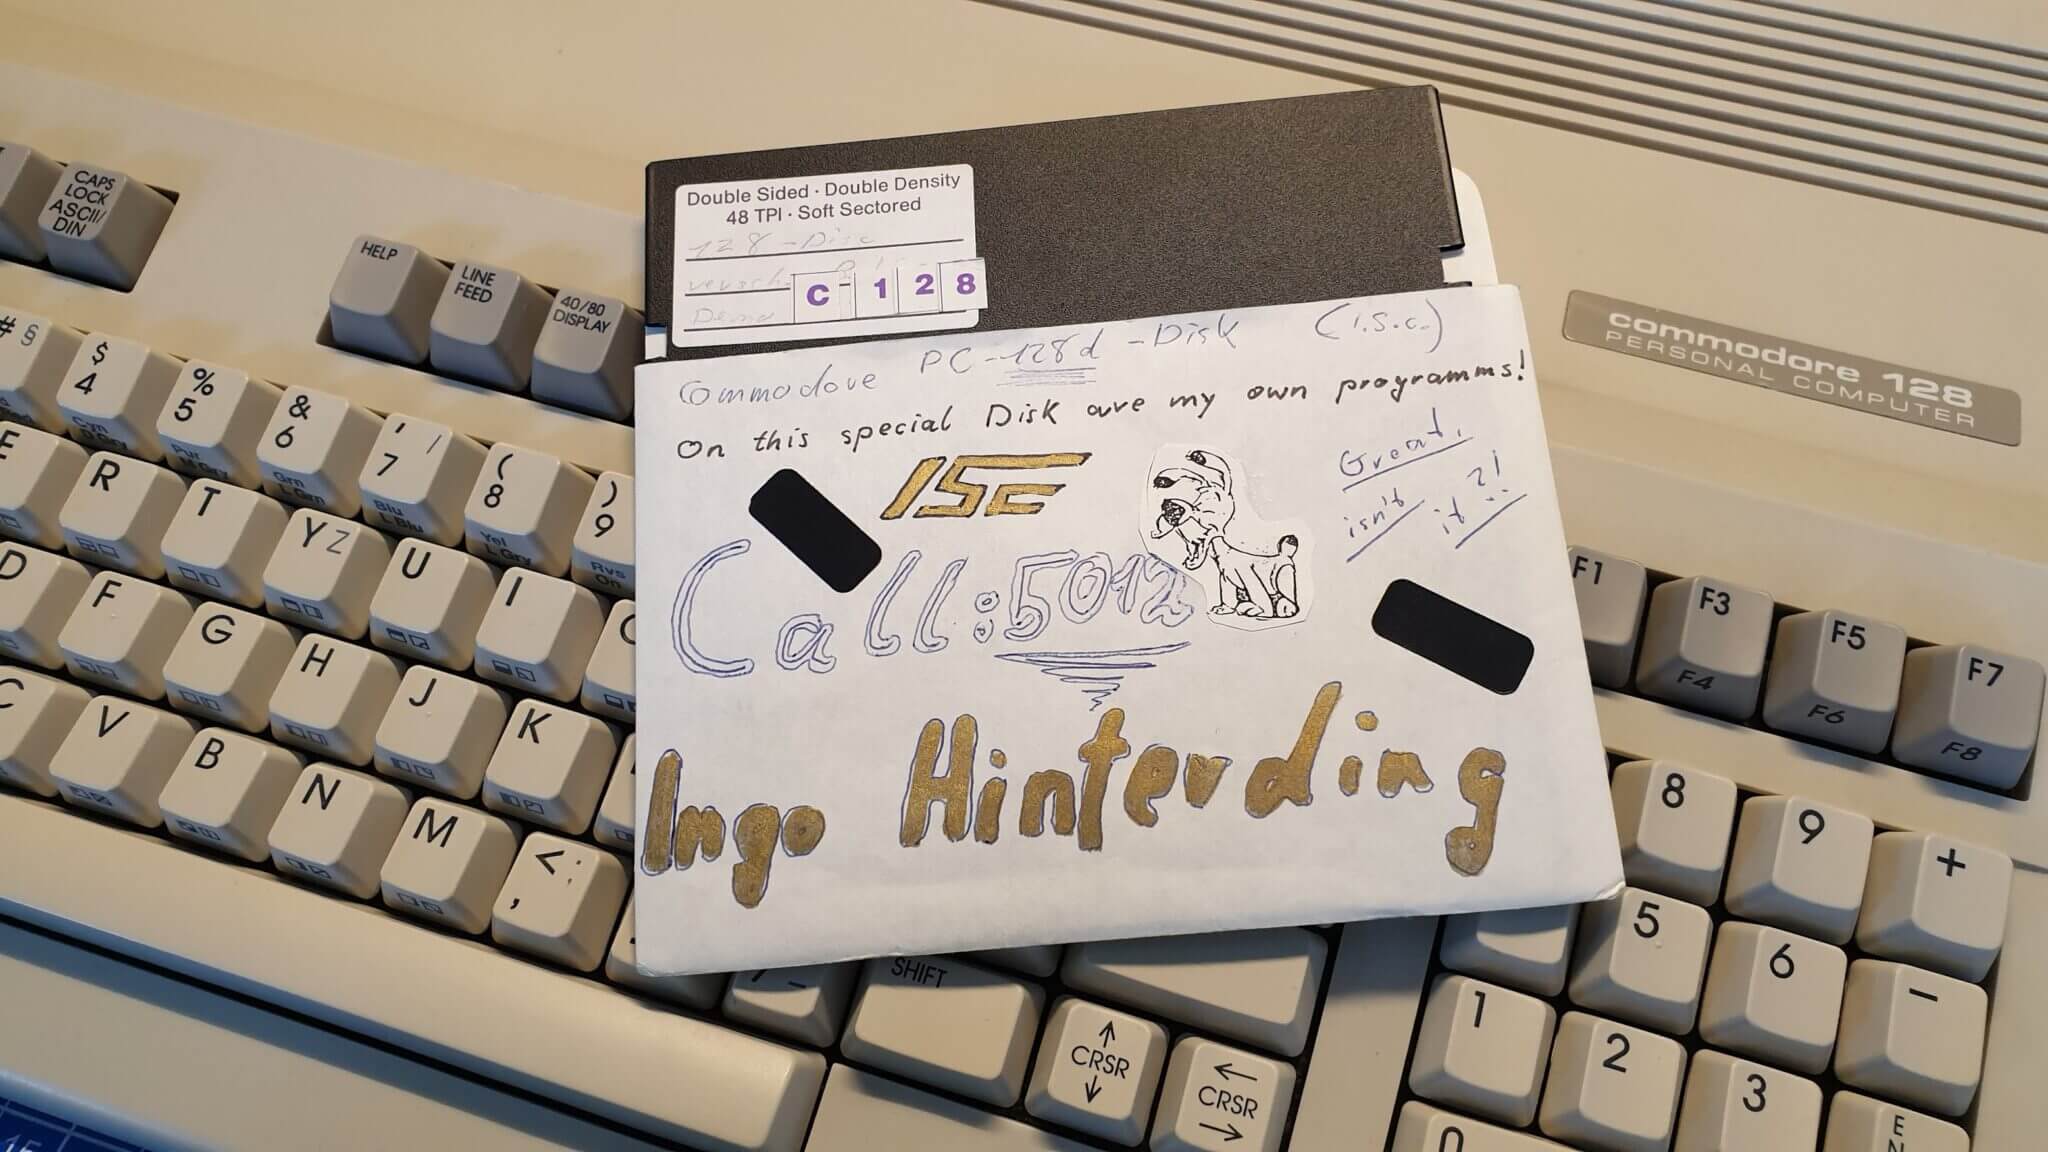
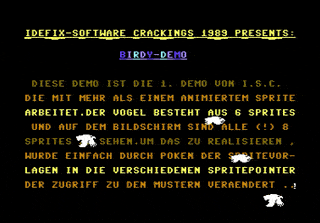
One of the floppies I found. “ISC” was short for “Idefix Software Crackings”. Haha.
Dumping the disks
After a quick check if any data was on the disks I decided to dump them and create digital copies, which was a straightforward procedure with the equipment I have on my workbench anyway:
- A Commodore 64 (could have been a C128 but I was too lazy to get it from the west wing of my enormous mansion)
- A 1541 floppy drive
- An Ultimate II+ floppy emulator cartridge
- A USB stick
The Ultimate II+, which is my favorite C64 drive emulation solution by far (I do have various SD2IEC devices, which do not come close, even not my amazing Turbo Chameleon cartridge), has a build-in disk copy program. Just select the source and the target drives, create a blank .d64 image and start the copy process. It takes less than a minute to make a digital copy of a single sided floppy. The only thing I’m not so sure about is that the disks could have been formatted in 1571 mode, which is the drive build into the C128D and supports merging both sides of a floppy into a single file system. Maybe there was more data stored on the disks? Let me know if you know how such a floppy would behave in the copy process described above.
Now I have eight D64 disk images full of teenage crap fantasies!

Most programs are animations of ripped sprites from C64 games


or animated todo lists…
…or plain teenager world domination fantasies…
some stuff looks quite decent actually.
Extracting code from a BASIC file
So now that we have the digital image of the floppy disk, how do we extract the source code of a program so we can edit it outside of the emulator or real C128? Luckily, the VICE emulator comes with everything needed! c1541 and petcat are programs in the tools folder of your VICE installation. You can start them from your terminal. The easiest solution would be to copy the D64 image into the tools folder and run your terminal commands from there.
Step one: extract all contents of a D64 image into single files:
./c1541 -attach disk.d64 -extractThis command will create files in your folder for every program on the disk. Easy peasy. But opening them in your favorite editor will not lead to success yet:
Step 2: convert the code to ASCII format:
./petcat -70 -o outputfile.txt -- intro-tgdPetcat converts the symbolic instructions of the BASIC interpreter into readable statements. Since we have a BASIC 7.0 listing, the -70 flag is needed to tell the program what to expect. After that we finally have the full listing in a readable format that we can fully edit….well…almost.
Some instructions can not be translated correctly, e.g. color and cursor commands inside a PRINT statement. Petcat replaces these with text in curly brackets, like this:
0 color0,2:graphic0,1:print"{down}{down}{down}{down}{down}{down}
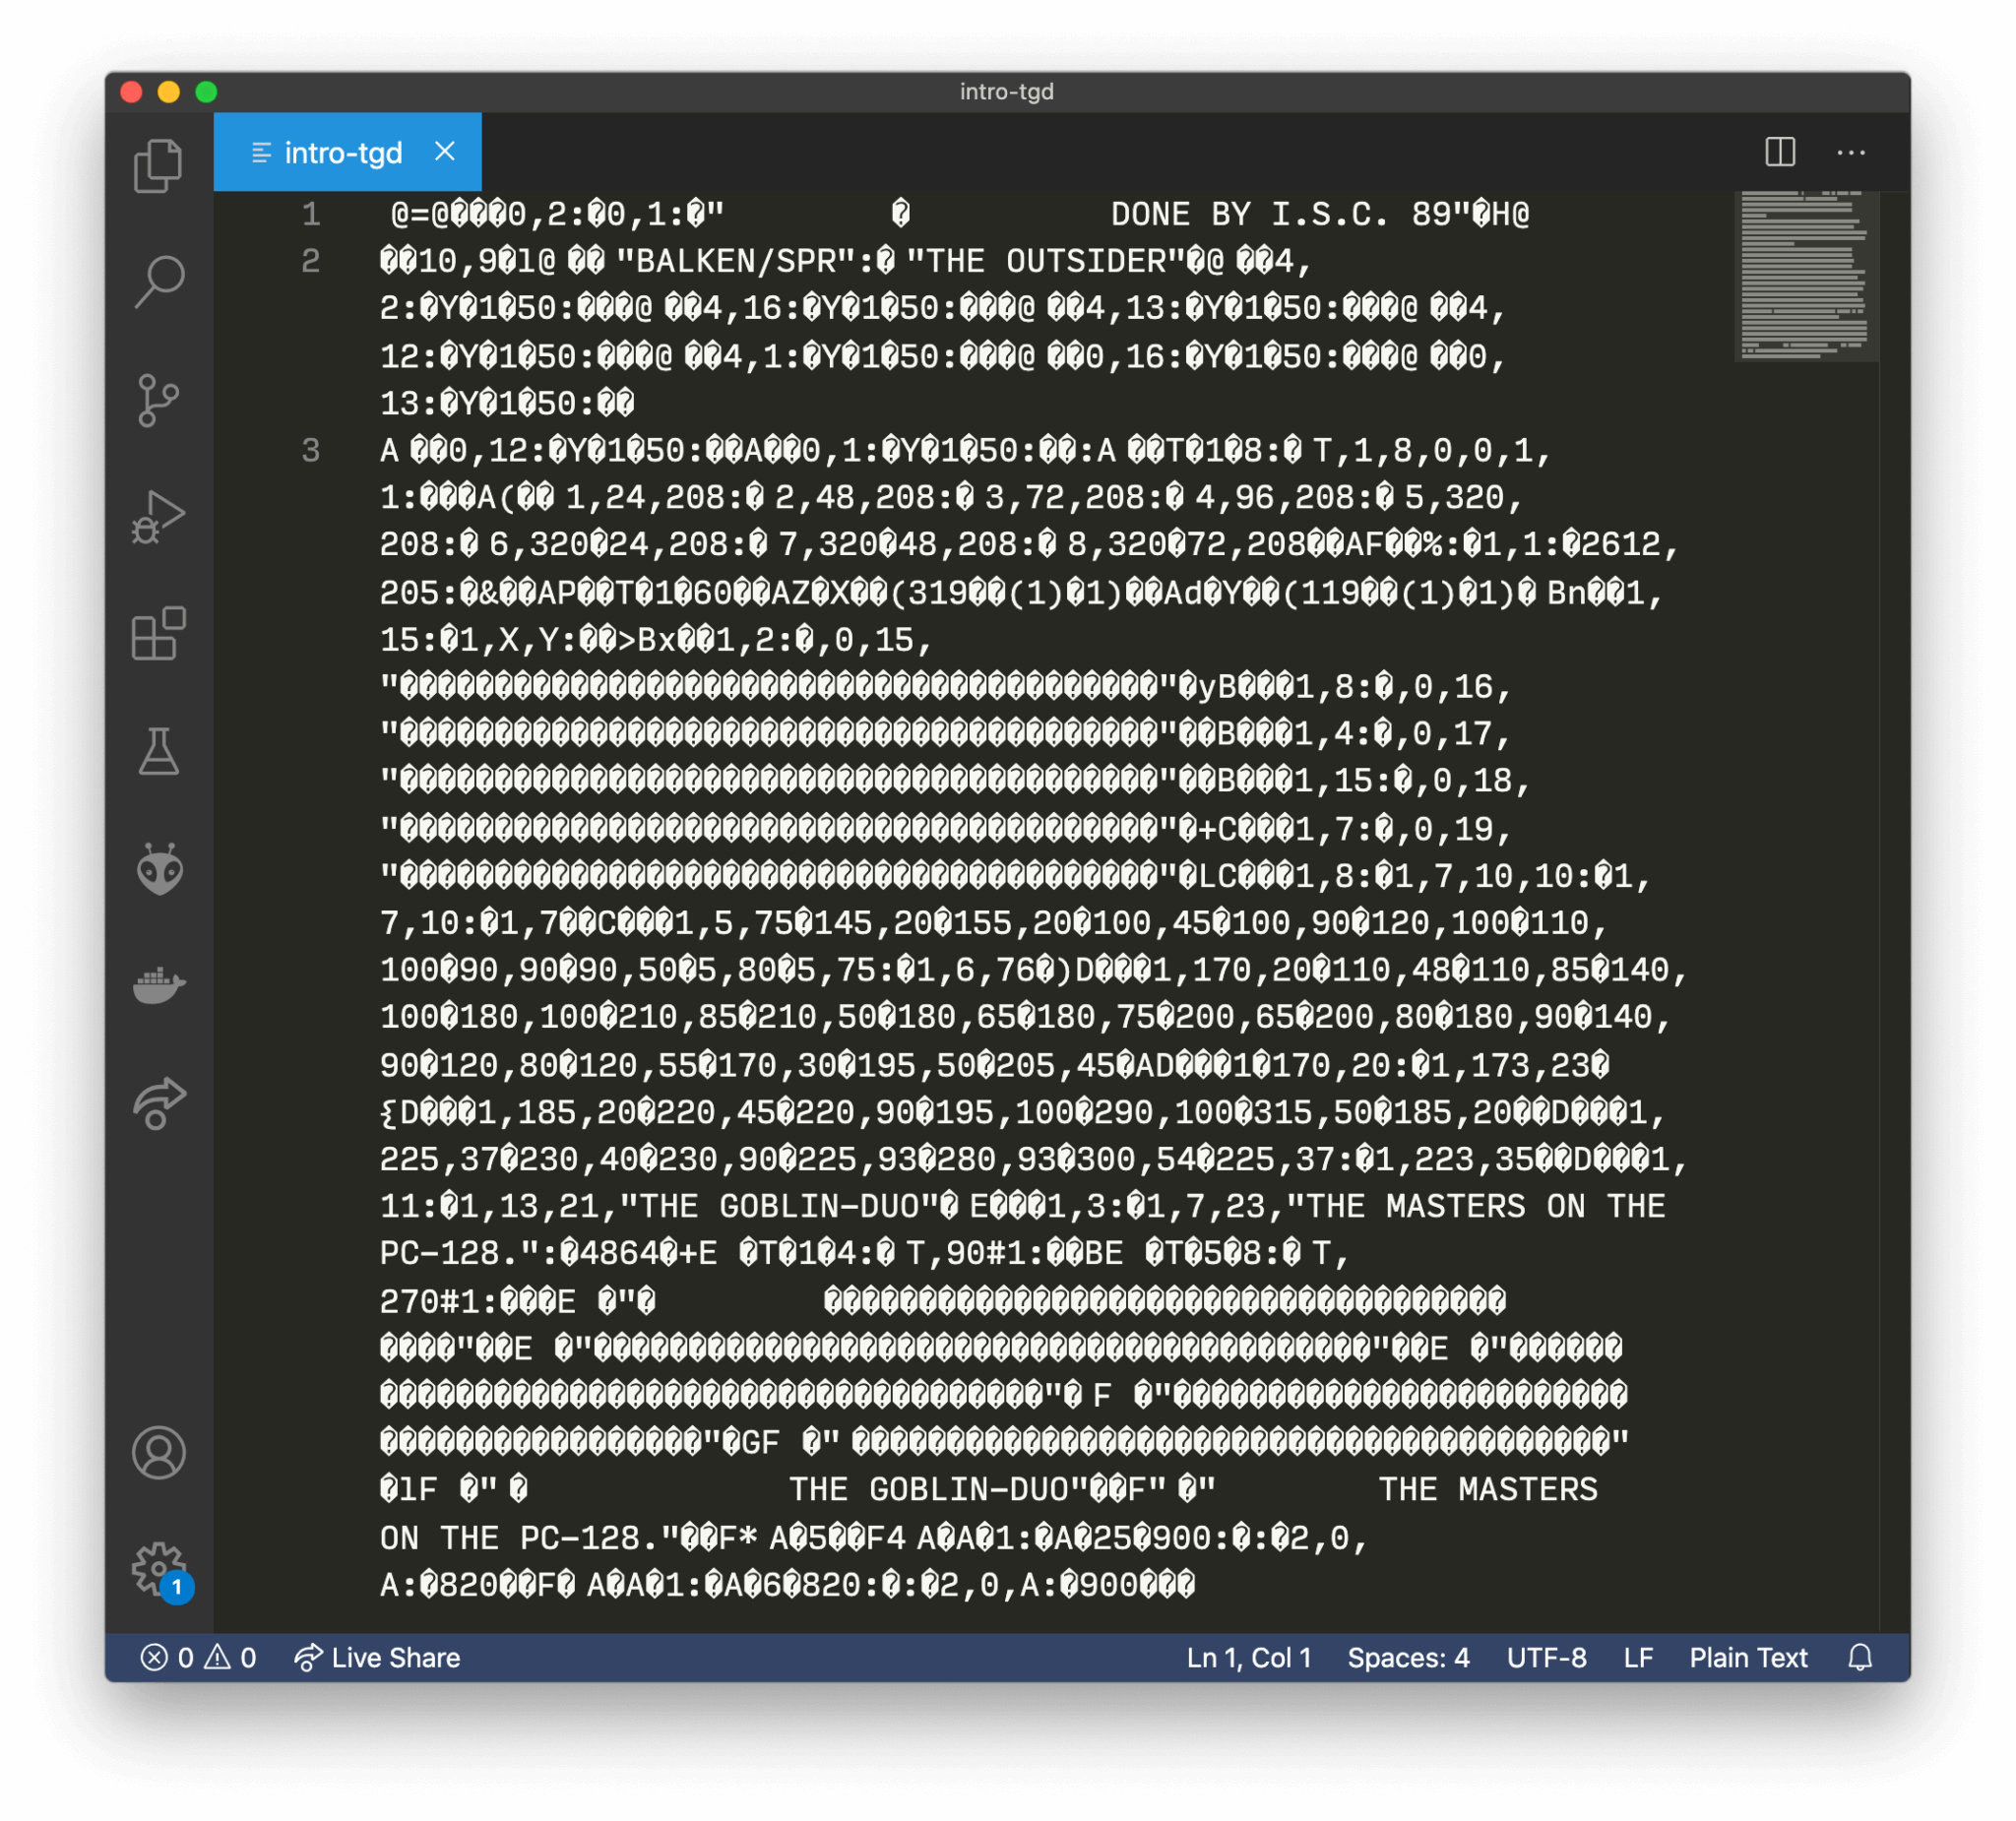
{down}{down}{down}{down}{down}{down} {blk} done by i.s.c. 89"To make this work, we have to replace that information with either ?CHR$(X) statements, or use different commands. Since this is a BASIC 7.0 program, I replaced most instructions by special commands like char. So without further ado, here’s the converted and slightly optimized code from 1989.
0 color0,2:color5,1:graphic0,1:char,12,12,"done by i.s.c. 89"
10 sprcolor10,9
20 bload"balken/spr":bload"the outsider"
21 color4,2:fory=1to50:next
22 color4,16:fory=1to50:next
23 color4,13:fory=1to50:next
24 color4,12:fory=1to50:next
25 color4,1:fory=1to50:next
26 color0,16:fory=1to50:next
27 color0,13:fory=1to50:next
28 color0,12:fory=1to50:next
29 color0,1:fory=1to50:next
30 fort=1to8:spritet,1,8,0,0,1,1:next
40 movspr1,24,208:movspr2,48,208:movspr3,72,208:movspr4,96,208:movspr5,320,208:movspr6,320-24,208:movspr7,320-48,208:movspr8,320-72,208
70 fast:graphic1,1:poke2612,205:slow
80 fort=1to60
90 x=int(319*rnd(1)+1)
100 y=int(109*rnd(1)+1)
110 color1,15:draw1,x,y:next
120 color1,2:char,0,15,"FFFFFFFFFFFFFFFFFFFFFFFFFFFFFFFFFFFFFFFF"
130 color1,8:char,0,16,"FFFFFFFFFFFFFFFFFFFFFFFFFFFFFFFFFFFFFFFF"
140 color1,4:char,0,17,"FFFFFFFFFFFFFFFFFFFFFFFFFFFFFFFFFFFFFFFF"
150 color1,15:char,0,18,"FFFFFFFFFFFFFFFFFFFFFFFFFFFFFFFFFFFFFFFF"
160 color1,7:char,0,19,"FFFFFFFFFFFFFFFFFFFFFFFFFFFFFFFFFFFFFFFF"
170 color1,8:circle1,7,10,10:paint1,7,10:color1,7
190 draw1,5,75to145,20to155,20to100,45to100,90to120,100to110,100to90,90to90,50to5,80to5,75:paint1,6,76
200 draw1,170,20to110,48to110,85to140,100to180,100to210,85to210,50to180,65to180,75to200,65to200,80to180,90to140,90to120,80to120,55to170,30to195,50to205,45
210 draw1to170,20:paint1,173,23
220 draw1,185,20to220,45to220,90to195,100to290,100to315,50to185,20
230 draw1,225,37to230,40to230,90to225,93to280,93to300,54to225,37:paint1,223,35
240 color1,11:char1,13,21,"the goblin-duo"
250 color1,3:char1,7,23,"the masters on the pc-128."
260 fort=1to4:movsprt,90#1:next
261 fort=5to8:movsprt,270#1:next
270 ?:?:?
271 color5,2:print"FFFFFFFFFFFFFFFFFFFFFFFFFFFFFFFFFFFFFFFF"
272 color5,8:print"FFFFFFFFFFFFFFFFFFFFFFFFFFFFFFFFFFFFFFFF"
273 color5,4:print"FFFFFFFFFFFFFFFFFFFFFFFFFFFFFFFFFFFFFFFF"
274 color5,15:print"FFFFFFFFFFFFFFFFFFFFFFFFFFFFFFFFFFFFFFFF"
275 color5,7:print"FFFFFFFFFFFFFFFFFFFFFFFFFFFFFFFFFFFFFFFF"
280 color5,11:?:print" the goblin-duo"
290 color5,3:?:print" the masters on the pc-128."
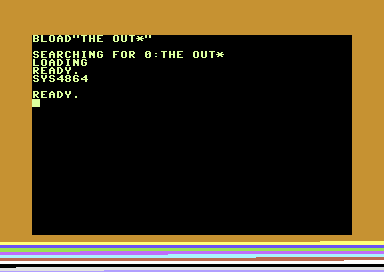
300 sys4864
810 a=5
820 a=a+1:ifa>25then900:else:graphic2,0,a:goto820
900 a=a-1:ifa<7then820:else:graphic2,0,a:goto900The program is only 45 lines of code, which is not too much considering everything we see is generated by code. But this is not entirely true. Two external files are loaded in line 20:
20 bload"balken/spr":bload"the outsider"bload is a special BASIC 7.0 command that loads in files to the location in memory specified in the file. The first command loads in the sprites that are used in the intro. No color information is stored in the file, it will be assigned later. This is how the sprite looks in the sprite editor:

This file could easily be replaced by some simple code.
The second command bload "the outsider" loads in a small assembly program which is responsible for displaying the rasterbars. So isn’t this cheating as one of the main effects in the demo is actually not written in BASIC after all? I would say no, for two reasons:
- the raster display code is quite horrible
- the much more interesting part of moving the rasters is done in BASIC!
We get to the second reason a little bit later (it’s kinda the magic trick of the demo), let’s look into the assembly code first:
The Assembly Rasterbar Code
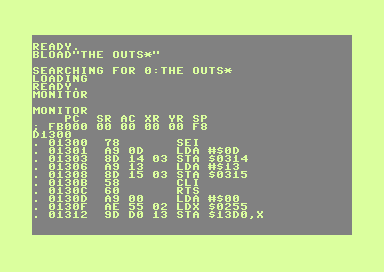
As you can see in the screenshot above, we can load in the assembly file by typing bload "filename" and then type in monitor to display machine language within the build in assembler (another amazing BASIC 7.0 feature). Then type in the address to display with d1300 which is the hexadecimal notation for decimal 4864, which the program calls with the sys 4864 command later in the listing.
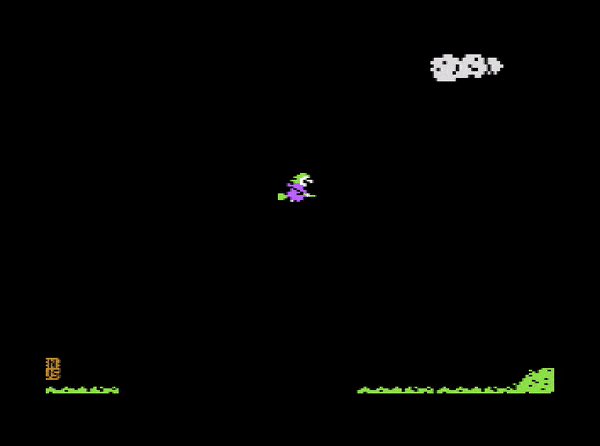
If we type in sys 4864 in BASIC, we execute the program:
To get this assembler listing in a readable format, VICE comes to the rescue again. It has it’s own monitor build in (look for it in the status bar under "machine", at least on the Mac), not to be confused with the C128 version, and it looks like this:
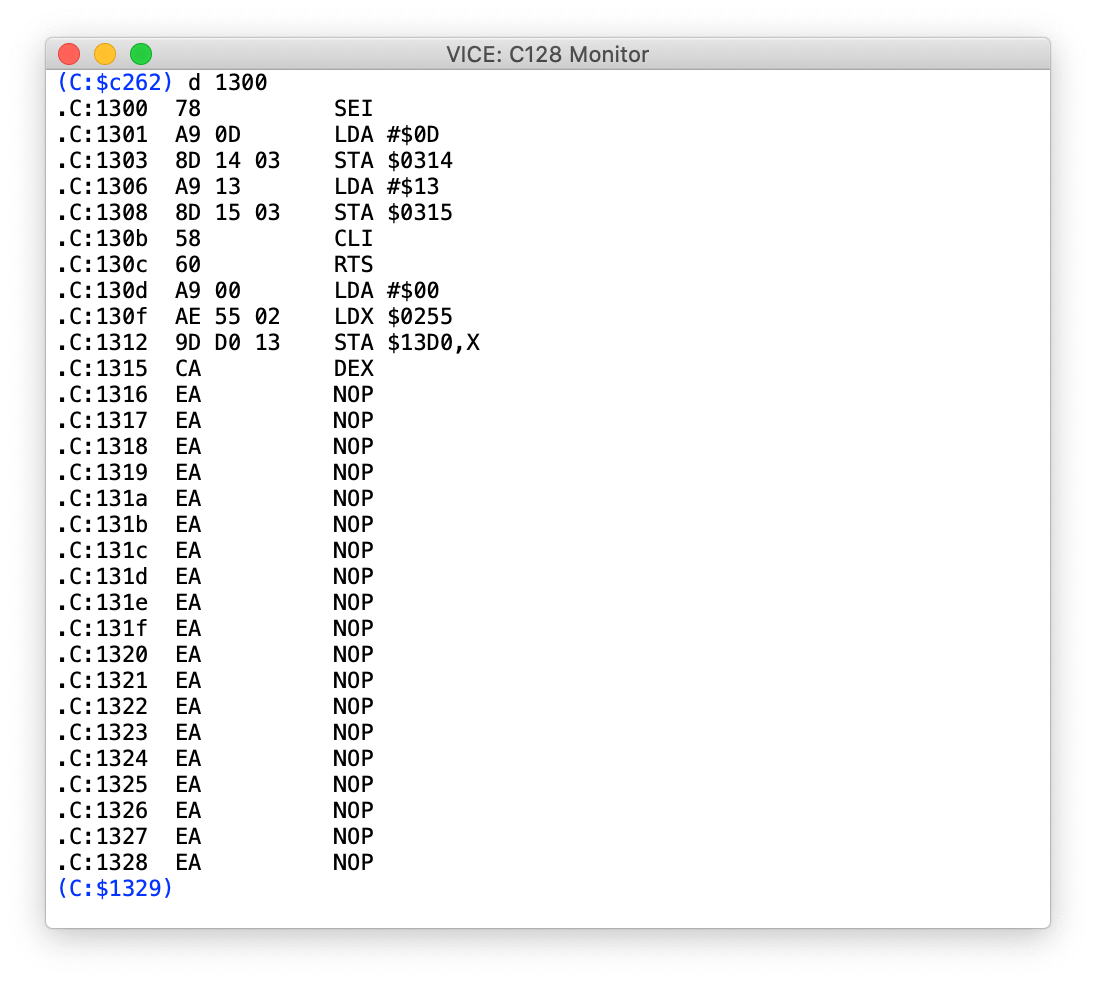
The full annotated listing:
.C:1300 SEI         ; disable all interrupts so we can change them
.C:1301 LDA #$0D    ; low byte of the raster code address we want to use
.C:1303 STA $0314   ; store low byte in interrupt vector
.C:1306 LDA #$13    ; high byte of the raster code address we want to use
.C:1308 STA $0315   ; store high byte in the interrupt vector
.C:130b CLI         ; enable interrupts again
.C:130c RTS         ; return to BASIC again

; the following shows how much I actually understood assembly
; the lines marked with "WTF" do not make sense at all
; and add nothing to the code

.C:130d LDA #$00    ; WTF: load 0 into accumulator
.C:130f LDX $0255   ; WTF: load the value of address $255 into X
.C:1312 STA $13D0,X ; WTF: store 0 at address $13d0 plus whatever is in X
.C:1315 DEX         ; WTF: decrement X
.C:1316 NOP         ; an endless number of NOPs (no operation)
.C:1317 NOP         ; until we change the color again
.C:1318 NOP
.C:1319 NOP
.C:131a NOP
.C:131b NOP
.C:131c NOP
.C:131d NOP
.C:131e NOP
.C:131f NOP
.C:1320 NOP
.C:1321 NOP
.C:1322 NOP
.C:1323 NOP
.C:1324 NOP
.C:1325 NOP
.C:1326 NOP
.C:1327 NOP
.C:1328 NOP
.C:1329 NOP
.C:132a NOP
.C:132b NOP
.C:132c NOP
.C:132d NOP
.C:132e NOP
.C:132f NOP
.C:1330 NOP
.C:1331 NOP
.C:1332 NOP
.C:1333 NOP
.C:1334 NOP
.C:1335 NOP
.C:1336 NOP
.C:1337 NOP
.C:1338 NOP
.C:1339 NOP
.C:133a NOP
.C:133b NOP
.C:133c NOP
.C:133d NOP
.C:133e NOP
.C:133f NOP
.C:1340 NOP
.C:1341 NOP
.C:1342 NOP
.C:1343 NOP
.C:1344 NOP
.C:1345 NOP
.C:1346 NOP
.C:1347 NOP
.C:1348 NOP
.C:1349 NOP
.C:134a NOP
.C:134b NOP
.C:134c DEC $D020    ; decrease the color of the border
.C:134f INC $D021    ; increase the color of the background
.C:1352 NOP          ; I must have spend hours to changes values
.C:1353 NOP          ; by trial and error here and at some point
.C:1354 NOP          ; got lucky with a halfway stable raster
.C:1355 NOP
.C:1356 NOP
.C:1357 NOP
.C:1358 NOP
.C:1359 NOP
.C:135a NOP
.C:135b NOP
.C:135c NOP
.C:135d NOP
.C:135e NOP
.C:135f NOP
.C:1360 NOP
.C:1361 NOP
.C:1362 NOP
.C:1363 NOP
.C:1364 NOP
.C:1365 NOP
.C:1366 NOP
.C:1367 NOP
.C:1368 NOP
.C:1369 NOP
.C:136a NOP
.C:136b NOP
.C:136c NOP
.C:136d NOP
.C:136e NOP
.C:136f NOP
.C:1370 NOP
.C:1371 NOP
.C:1372 NOP
.C:1373 NOP
.C:1374 NOP
.C:1375 BNE $1312    ; has X been looped (from $00 to $ff)?
                     ; no, continue looping
                     ; yes, end interrupt routine
                     ; (also I swear I didn't know
                     ; about the '1312' code back then…)
.C:1377 JMP $FA65    ; end interrupt
Wow. That code is clearly a work of art. Obviously I didn’t know the tiniest thing about assembly back then and achieving a relatively stable rasterbar was pure trial & error. Some of the code is not even used for the rasterbars at all and contains an addressing error (LDX $0255 which loads the value of address $0255 into X instead of a LDX #255 which loads the value 255 into X).
Let’s clean up this mess.
* = $1300

        sei         ; disable all interrupts so we can change them
        lda #irq   ; high byte of the raster code address we want to use
        sta $0315   ; store high byte in the interrupt vector
        cli         ; enable interrupts again
        rts         ; return to BASIC again

irq
        inc $d020   ; decrease border color

        !for loop, 0, 90 {
		nop         ; generate NOPs
        }

        bne irq     ; not 0 yet? jump to start of irq
        jmp $fa65   ; we're done
Ok, somewhat better.
- code garbage (that never executes anyway) removed
- border and background color code moved to start of irq routine (because it doesn’t matter where it is executed at all)
- NOP code shortened with ACME assembler loop
- background color change removed
The super odd thing about this routine is that the BNE command actually triggers whenever the border color (previously the background color) reaches 0, thus rotating through all 16 colors and then leaving the loop. It goes without saying that this code was not a result of my smartness, but absolute cluenessness. It just accidentally happend to work.
So, that’s the assembly part of the demo. A weird piece of shitty code that works only by pure luck and the patience of a 15 year old kid who had nothing else to do after school. What a great life that kid had!
The BASIC Code
Now that we got the embarrasing assembly code out of the way, let’s move on to the BASIC code, which is mostly straightforward and shows off a neat trick.
0 color0,2:color 5,1:graphic0,1:char,12,12,"done by i.s.c. 89"color 0,2sets the background color to whitecolor 5,1sets the text color to blackgraphic 0,1clears the screenchar,12,12,"done by i.s.c. 89"prints the text at x=12,y=12
10 sprcolor10,9- sets the sprite multicolor one to 10 (brown) and multicolor two to 9 (orange)
21 color4,2:fory=1to50:next
22 color4,16:fory=1to50:next
23 color4,13:fory=1to50:next
24 color4,12:fory=1to50:next
25 color4,1:fory=1to50:next
26 color0,16:fory=1to50:next
27 color0,13:fory=1to50:next
28 color0,12:fory=1to50:next
29 color0,1:fory=1to50:next- first fades the border color to black, then the background color. The loop only delays the fading time
30 fort=1to8:spritet,1,8,0,0,1,1:next- sets all 8 sprites to: active, yellow, display over background, no x stretching, y stretching, multicolor
40 movspr1,24,208: movspr2,48,208: movspr3,72,208: movspr4,96,208: movspr5,320,208: movspr6,320-24,208: movspr7,320-48,208: movspr8,320-72,208- positions all eight sprites at their start position
70 fast:graphic1,1:poke2612,205:slow- goes into 2Mhz fast mode, then initializes bitmap graphics and clears the screen. The
pokecommand sets the scan line for the screen split. And back to 1Mhz mode again
The fast and slow commands do not really matter that much in terms of speed, but they hide the VIC garbage to be displayed before the screen is cleared. The raster split poke does not add anything here.
80 fort=1to60
90 x=int(319*rnd(1)+1)
100 y=int(109*rnd(1)+1)
110 color1,15:draw1,x,y:next- this loop draws the stars at random positions on the upper half of the screen
120 color1,2:char,0,15,"FFFFFFFFFFFFFFFFFFFFFFFFFFFFFFFFFFFFFFFF"
130 color1,8:char,0,16,"FFFFFFFFFFFFFFFFFFFFFFFFFFFFFFFFFFFFFFFF"
140 color1,4:char,0,17,"FFFFFFFFFFFFFFFFFFFFFFFFFFFFFFFFFFFFFFFF"
150 color1,15:char,0,18,"FFFFFFFFFFFFFFFFFFFFFFFFFFFFFFFFFFFFFFFF"
160 color1,7:char,0,19,"FFFFFFFFFFFFFFFFFFFFFFFFFFFFFFFFFFFFFFFF"- draws the five colored lines with the PETSCII charset
170 color1,8:circle1,7,10,10:paint1,7,10:color1,7- sets the color to yellow (8), draws a circle with the foreground color at position 7,10 with a radius of 10. Fills the circle and sets the color to blue afterwards (for the logo)
190 draw1,5,75 to 145,20 to 155,20 to 100,45 to 100,90 to 120,100 to 110,100 to 90,90 to 90,50 to 5,80 to 5,75:paint1,6,76
200 draw1,170,20 to 110,48 to 110,85 to 140,100 to 180,100 to 210,85 to 210,50 to 180,65 to 180,75 to 200,65 to 200,80 to 180,90 to 140,90 to 120,80 to 120,55 to 170,30 to 195,50 to 205,45
210 draw1 to 170,20:paint1,173,23
220 draw1,185,20 to 220,45 to 220,90 to 195,100 to 290,100 to 315,50 to 185,20
230 draw1,225,37 to 230,40 to 230,90 to 225,93 to 280,93 to 300,54 to 225,37:paint1,223,35- several draw commands create the outline of the logo letters and are afterwards filled with the paint command
240 color1,11:char1,13,21,"the goblin-duo"
250 color1,3:char1,7,23,"the masters on the pc-128."- displays “the goblin-duo” and “the masters on the pc-128.” in colors light red and red
260 fort=1to4:movsprt,90#1:next
261 fort=5to8:movsprt,270#1:next- moves sprites 1-4 to the right at speed 1 and sprites 5-8 to the left at speed 1
This is another example of just how awesome BASIC 7.0 is. Two lines of code to move all sprites. And most importantly, these sprites will keep moving without any more code needed. Just cool.
270 ?:?:?
271 color5,2:print"FFFFFFFFFFFFFFFFFFFFFFFFFFFFFFFFFFFFFFFF"
272 color5,8:print"FFFFFFFFFFFFFFFFFFFFFFFFFFFFFFFFFFFFFFFF"
273 color5,4:print"FFFFFFFFFFFFFFFFFFFFFFFFFFFFFFFFFFFFFFFF"
274 color5,15:print"FFFFFFFFFFFFFFFFFFFFFFFFFFFFFFFFFFFFFFFF"
275 color5,7:print"FFFFFFFFFFFFFFFFFFFFFFFFFFFFFFFFFFFFFFFF"
280 color5,11:?:print" the goblin-duo"
290 color5,3:?:print" the masters on the pc-128."- we are drawing the same colored lines again and display the same text as before.
But why, isn’t that redundant? Well, it’s not and it’s part of the “big trick” I’m pulling off here. To get a hint, note that I’m using the char command first and the print command later.
300 sys4864- executes the assembly code that was loaded in earlier
810 a=5
820 a=a+1:ifa>25then900:else:graphic2,0,a:goto820
900 a=a-1:ifa<7then820:else:graphic2,0,a:goto900- increases or decreases variable a and sets the position of the screen split to a
So this is the little trick that makes the rasterbars move up and down! And it explains why I needed to display the text twice on the screen. The graphic 2,0,a command splits the screen between bitmap and text mode at a certain raster line. Everything above is bitmap graphic, everything below is text. Earlier I copied the text into the bitmap by using char and copied the same text onto the text screen using print. Since the location on the screen is the same, it appears as if the text would not change and be affected by the screen split.
If you’re familiar with raster interrupts on the C64 or C128, you probably already noticed in the assembly code that I did not define a raster line for the interrupt. Well, turns out this “oversight” is the reason this works at all. Whenever I change the screen split in BASIC, the rasterbars are displayed at that exact position, thus creating this up and down movement.
And that is the whole trick how to animate rasterbars in BASIC 7.0!
If you want to play around with the code, feel free to download it from my github page.
Thank you for reading this article 🙂