The Fairlight Intro
on Sun May 09 2021 by Ingo HinterdingThis C64 intro from Fairlight ist nothing less than iconic and engraved in our collective memory as the beginning of an art form. In this article I share my learnings unpacking and disassembling the code.
Alright, before starting, I've got to admit that this is my second attempt at disassembling this program. The first time I got sidetracked and ended up writing a new disassembler in Python. That's why I'm just a hobby developer - I can chase ideas like an overexcited puppy dog hunting squirrels, giving a damn shit about the worrying sprint cycle burndown chart and the Product Owner being up my arse about fixing those critical bugs that keep exposing customer's credit card data to the public. Did I mention I'm a Product Owner in real life?

Where was I... ah yes, unpacking the Fairlight intro.
The Fairlight Intro
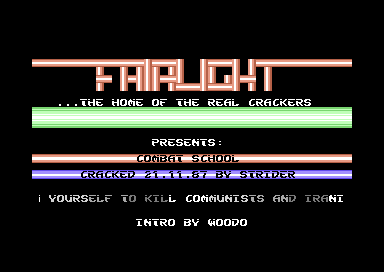
Let's take a look at this beauty from the year 1987. You can download it from csdb.dk and use an emulator like VICE to watch it. It's worth noting that many Commodore 64 intros of that time were more impressive from a technical standpoint, like the wonderful Papillons intro (1988) or the Dynamic Duo intro (1986). But besides the equally iconic Eagle Soft Incorportated intro, very few managed to leave such a lasting impression. I have very fond memories of these cracktros and even converted some of my favorites to JavaScript. My demo group Mayday! did a tribute to the intro as well.
csdb.dk counts a massive 185 games released with this cracktro. That's like four big boxes of 5 1/4 inch floppy discs. No wonder there was no way around this intro as Fairlight was impressively active during that time.
Written by Woodo, who's last C64 release according to csdb was in 1992, this intro still scores high among demo sceners:
"I'd say together with ESI's eagle intro, this is the most legendary intro on the c-64. Still get goose bumps looking at it." (Freestyle)
"Probably the most known intro scene-wise. Brings back a lot of memories." (Jailbird)
"'L' like LEGENDARY! 'O' like OMG! 'V' like VIRTUOSIC! 'E' like EPIC! Short: LOVE <3" (Shine)
"I must be an exception, I've only learned about this intro and its legendaryness in the late 90's and honestly I think its awful." (Oswald)
Err... thanks Oswald.
How to disassemble a binary program
The easiest way to convert machine language into readable assembly code is to use a disassembler program. There are several options available and I've written an extensive article about the topic on how to write a 6502 disassembler. I'll use pyDisass6502 since I've written it myself and can tweak it whenever needed. It's part of the fun.
Step 1: run the program in an emulator
I'm using the VICE emulator, mostly because it's reliable and I got used to it. But there are alternatives, and the 64debugger is an especially powerful tool, which, if mastered, can provide you with some shortcuts in the process mentioned further on. I encourage you to check it out and give it a try, however, I will stick to old trusty VICE for this article.
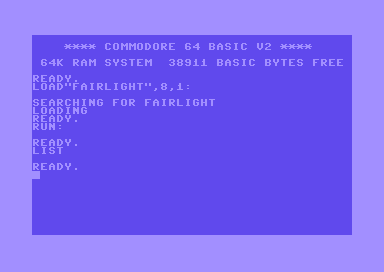
The Fairlight intro PRG file downloaded from csdb.dk can be executed by double clicking or by drag'n'drop onto the emulator window. Since it starts automatically, you would not see the BASIC program (usually something like a 10 SYS 2064). You can check for that from the VICE monitor, but here's a little workaround in case you want to prevent the program from starting immediately (there's a reason why I explain this, more about that later).
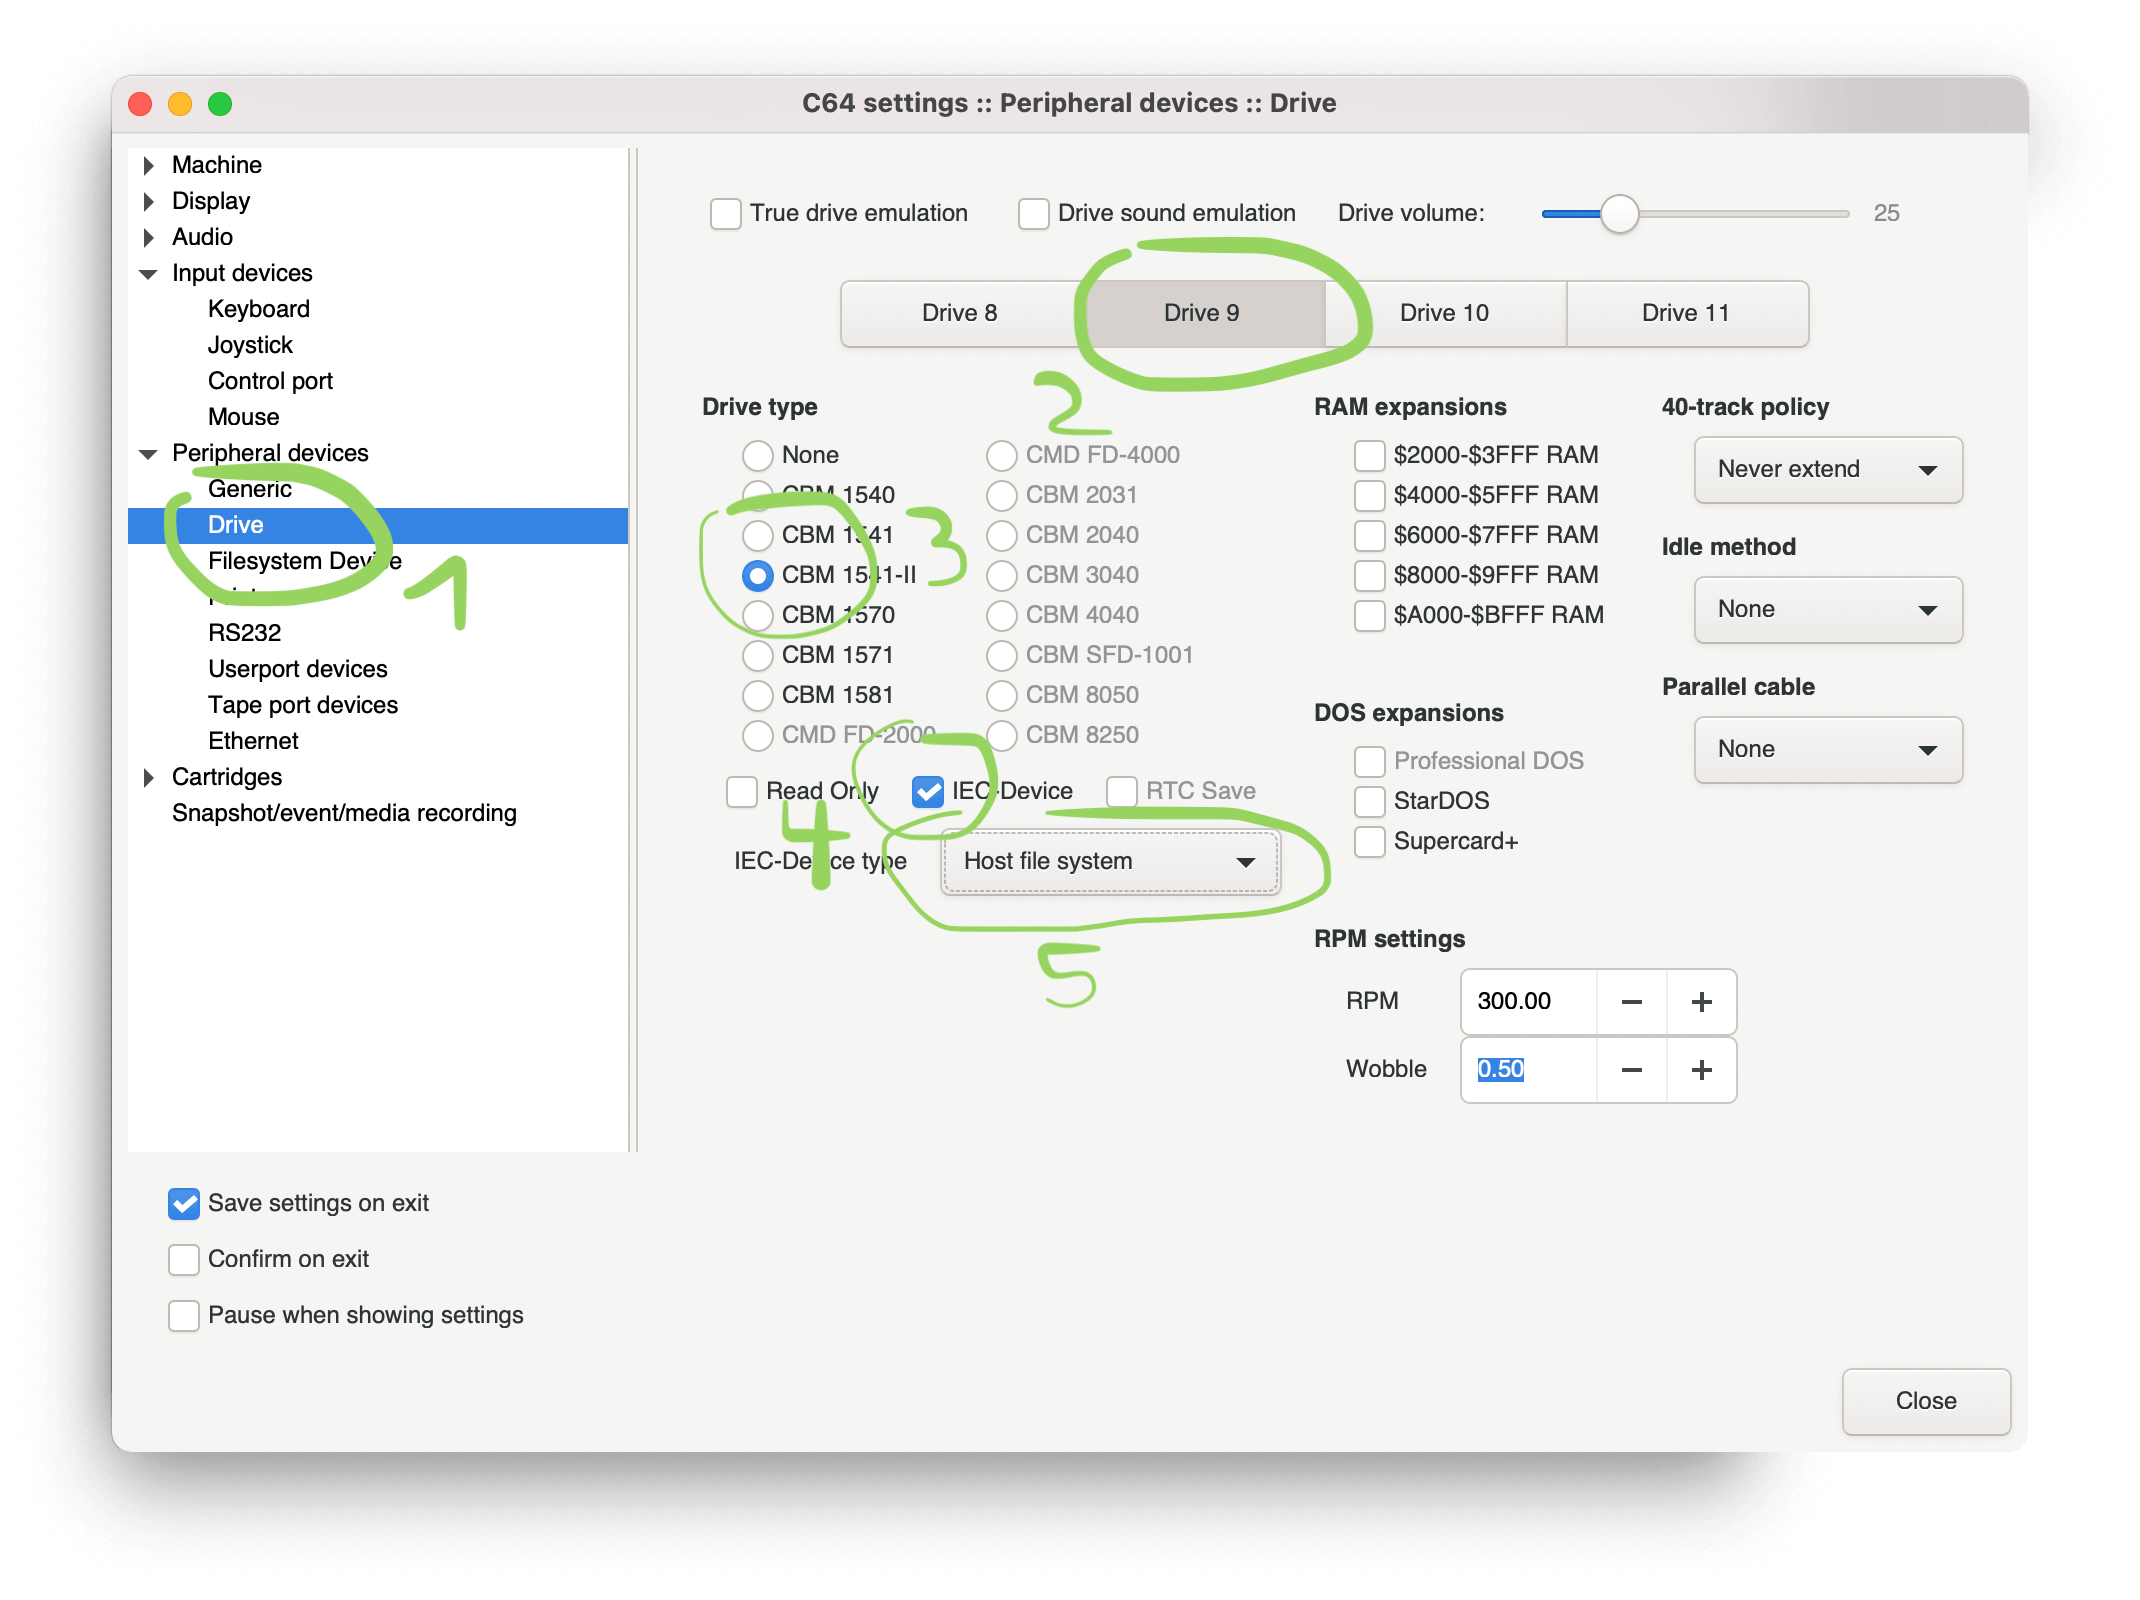
Setting drive 9 as a SD2IEC device in VICE
Go to Settings (either from the menu "Settings > Settings...") or by pressing command + o (Mac, not sure about Windows or Linux).
- Click on "Peripheral Devices" > "Drive".
- Click on Drive 9
- Choose a drive type (1541 or 1541-II for example)
- Check IEC-Device
- Choose "Host file system" from dropdown
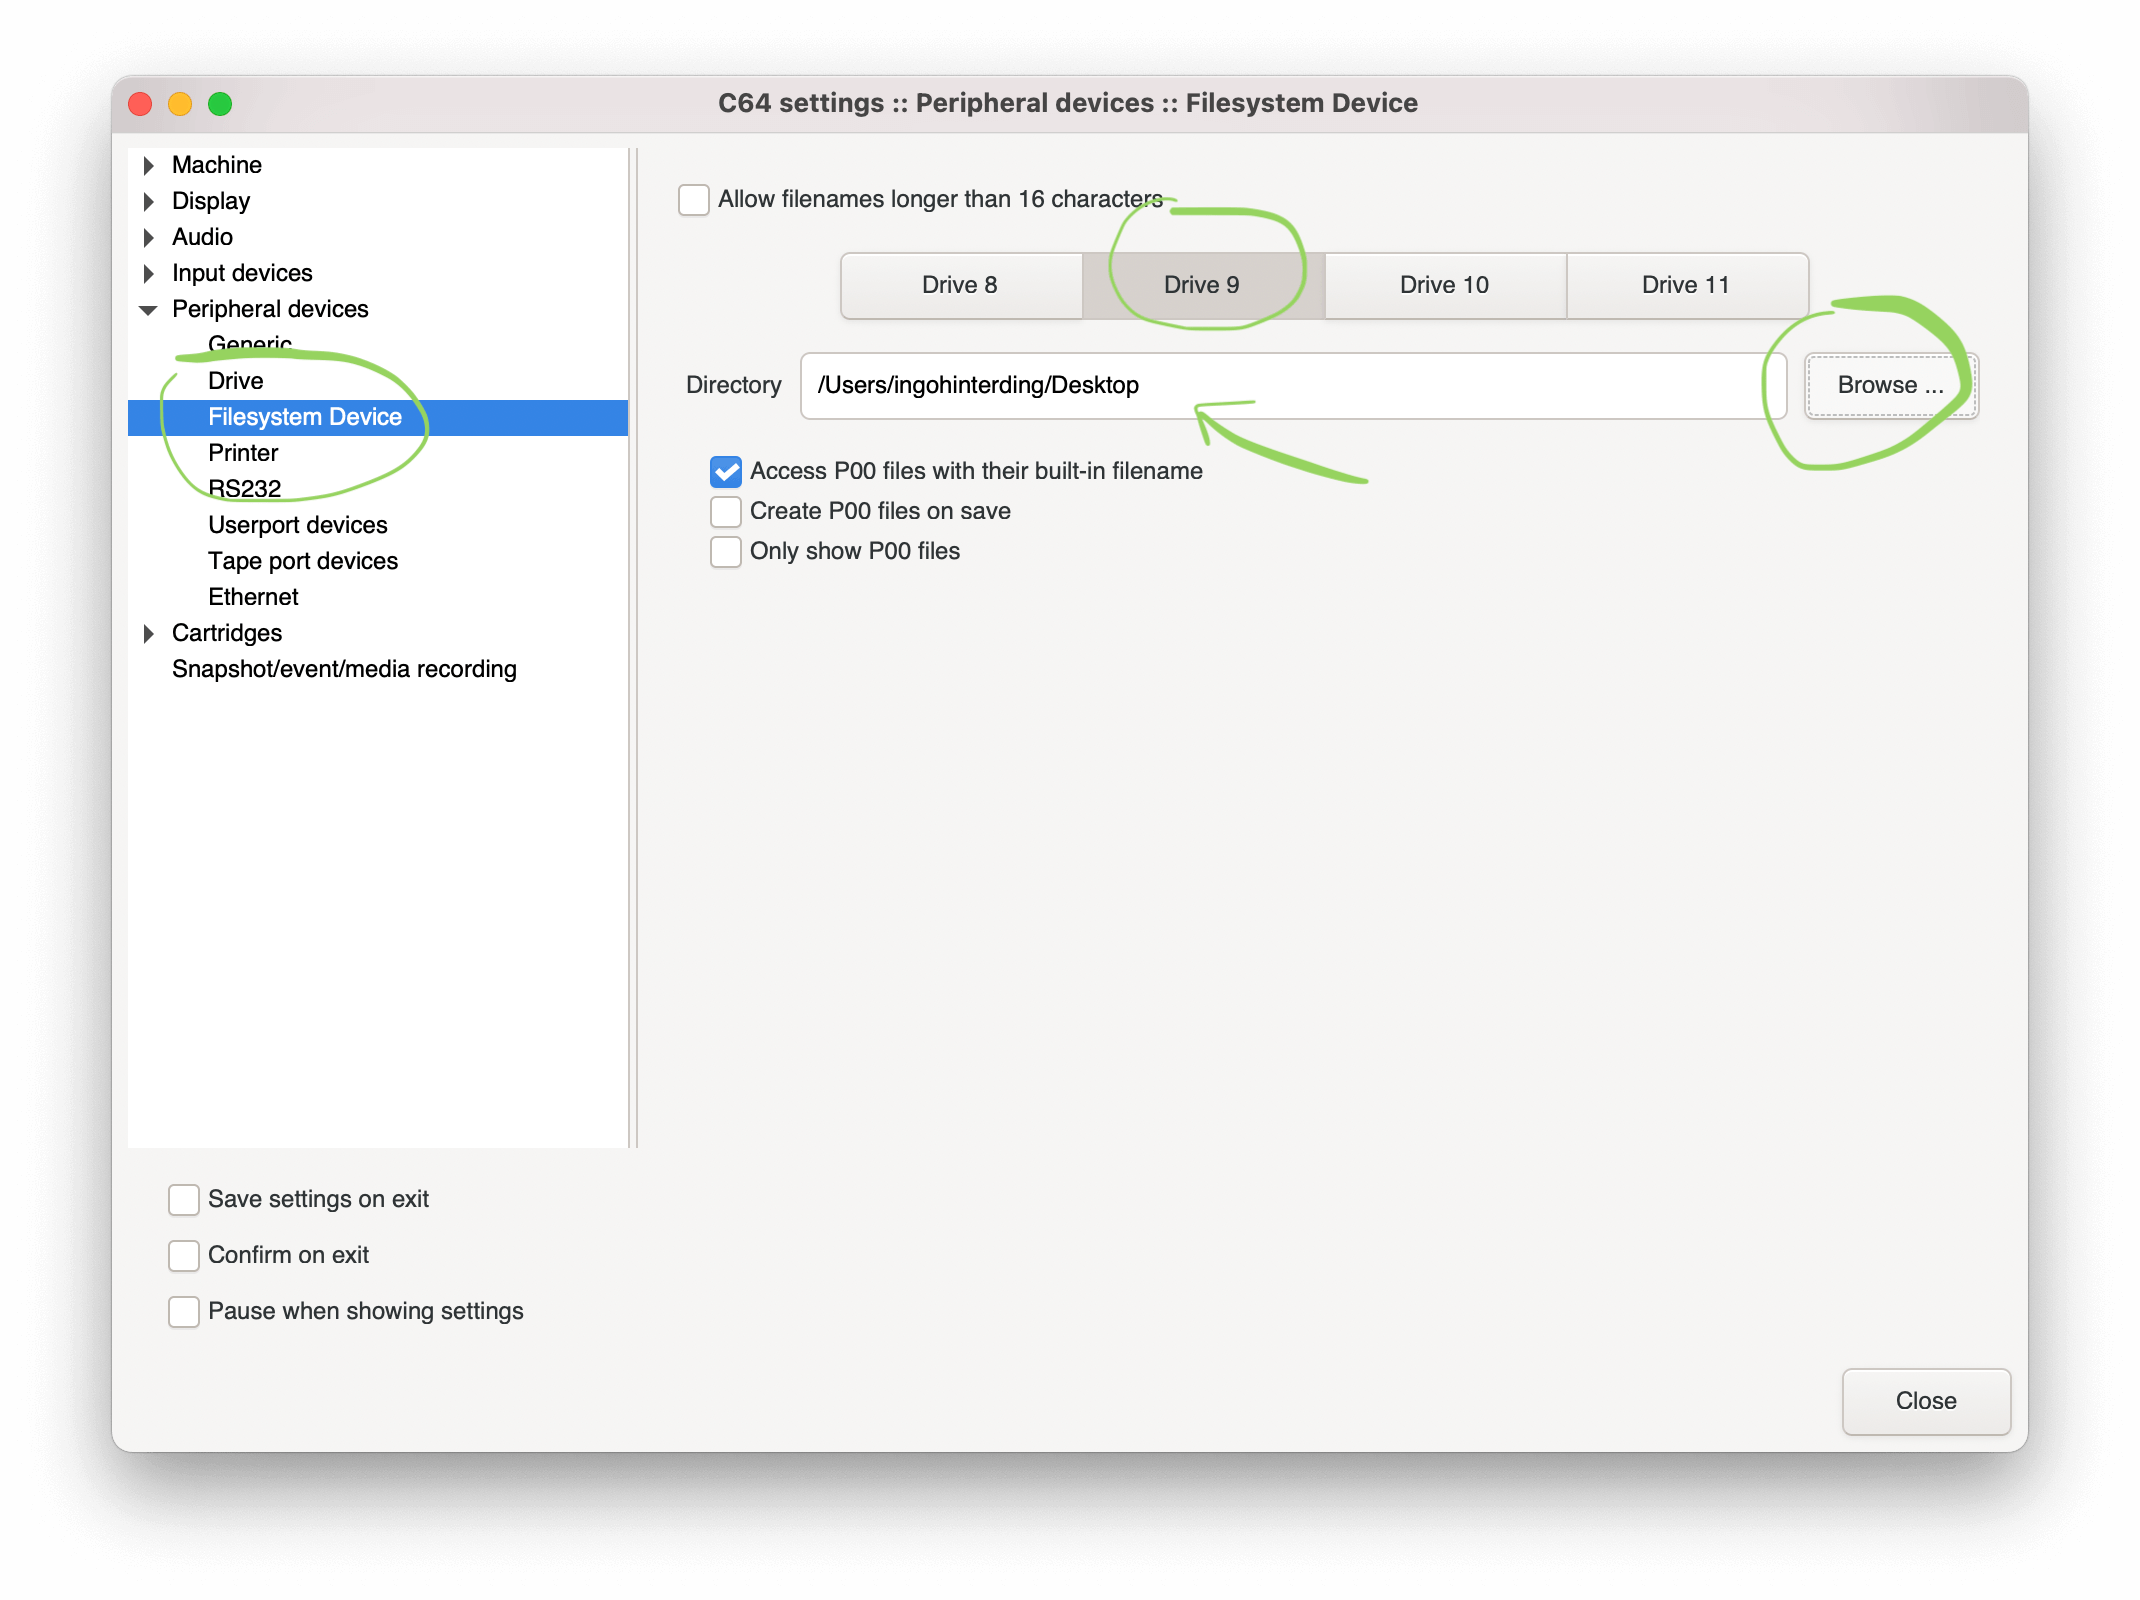
- Next, go to "Peripheral Devices" > "Filesystem Device"
- Click on Drive 9
- Click on "Browse..." button and choose the folder where your file is in
- Click "Close" button
- Make sure you save your settings
VICE looks quite different on various operating systems and your menu structure might vary from the screenshots above, but the overall process should be similar.
Loading the PRG via drive 9
Using the new configuration, we can simply type
load"$",9at the BASIC prompt to get the directory of the host file system displayed on the C64.
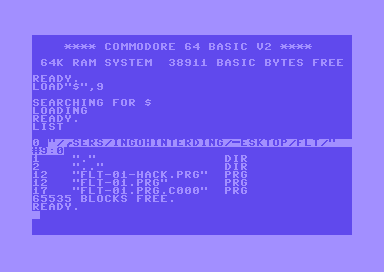
And we can load and list the program as if we loaded it from a D64 image or real floppy.
load"flt-01.prg",9,1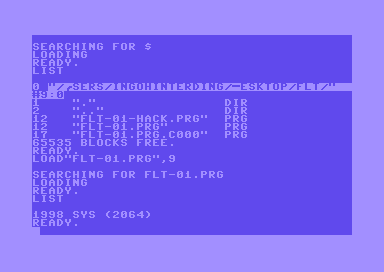
Now we can see the SYS command and that the program is located at address 2064 or hex $0810 in memory. And sure enough, this is the beginning of the code. Hint: it's useful to have a memory map of the C64 at hand when analyzing code. I've added comments to illustrate what's going on:
.C:0810  78          SEI                ; disable interrupts
.C:0811  A9 34       LDA #$34           ; A = $34
.C:0813  85 01       STA $01            ; store it at address $01 to configure RAM and IO
.C:0815  A2 05       LDX #$05           ; X = $05
.C:0817  BD 42 08    LDA $0842,X        ; load the next 5 bytes from $0842
.C:081a  9D 2D 00    STA $002D,X        ; and store them in zeropage from $2d
.C:081d  CA          DEX                ; X--
.C:081e  10 F7       BPL $0817          ; loop
.C:0820  9A          TXS                ; put X on stack
.C:0821  A0 00       LDY #$00           ; Y = $00
.C:0823  C6 32       DEC $32            ; decrease zeropage address $32
.C:0825  CE 2C 08    DEC $082C          ; decrease $082c <- selfmod
.C:0828  B1 31       LDA ($31),Y        ; load from address that is at $31 + Y
.C:082a  99 00 00    STA $0000,Y        ; store at $0000 <- selfmod destination
.C:082d  C8          INY                ; Y++
.C:082e  D0 F8       BNE $0828          ; loop
.C:0830  A5 32       LDA $32            ; A = byte at address $32
.C:0832  C9 08       CMP #$08           ; is it $08?
.C:0834  D0 ED       BNE $0823          ; no
.C:0836  B9 48 08    LDA $0848,Y        ; yes, load more stuff
.C:0839  99 00 01    STA $0100,Y        ; and move it to $0100
.C:083c  C8          INY                ; Y++
.C:083d  D0 F7       BNE $0836          ; loop
.C:083f  4C 00 01    JMP $0100          ; jump to address $0100
Hm. This is not exactly what I expected. Instead of the intro code we see a sophisticated program that copies data in memory and then calls that data by jmp $1000 at the end. What's going on?
Packing / Crunching
A little interlude while I wait for the 45 gigabytes download of the Cyberpunk 2077 patch...
Back in the 80's disk space and computer memory were extremely limited and thus expensive. In addition, especially Commodore's 1541 disk drives were so slow you could almost high five every single byte that snailed its way through the serial cable into the computer. "Hey there $A9, how are things today? Wow, $32, haven't seen you in a while... oh boy, if that isn't ma man $FF...".
Therefore, file compression was invented (not true) and these tools are called packers, or crunchers. Some popular ones are for example exomizer or Pucrunch. Packing a program with these would significantly reduce the file size and speed up loading times. The extra time the computer needs to unpack the file again can be ignored in comparison to the much faster loading.
Unpacking
Unfortunately for us who are sticking our noses into decades old intros, packed code is a pain the butt, because we can't just disassemble the program without unpacking it first. Let's cover this next.
Unpacking method 1: the lazy aka wrong way
Since the program comes with batteries included, it can unpack itself and run the intro code when it's done. So why not let that unpack routine do the hard work for us? We start the intro either by typing RUN or by entering SYS2064. Everything works as expected and we see the fake rasterbars moving, the logo, the scroller, the music. Cool. But a fundamental question comes up now.
Where in memory is the actual intro located?
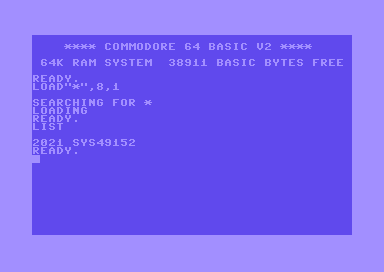
There are some usual suspects that help you find the right entry point. The simplest is following the code that gets executed first, which in our case is at address 2064. If the program isn't packed, this might be the actual code right there. Another typical location in memory is $c000 hex or 49152 decimal. Let's take a look there:
.C:c000  78          SEI
.C:c001  A9 C1       LDA #$C1
.C:c003  8D 15 03    STA $0315
.C:c006  A9 74       LDA #$74
.C:c008  8D 14 03    STA $0314
[..]
Bingo. This is a typical code section at the beginning of a program. It disables interrups with SEI and then sets the IRQ vector with STA $0315 and STA $0314. Whenever you find code like this, it's likely at the start of a program. I highly recommend getting familiar with VICE's monitor commands, which provide powerful tools like the hunt command. For example, to search through the whole memory for the STA $0315 instruction (or 8d 15 03 in hex notation), just enter
h 0000 ffff 8d 15 03 ; format: start_addr end_addr byte byte byteand VICE returns all occurances of that byte sequence:
093e
0acb
c003  ; <- the one we were looking for
c190
fcad
fcc6
Now we know where the code starts, but where does it end? In this case it's quite easy. Our code sits in the upper RAM area, which is a section of 4096 bytes from C000 to CFFF. We can now save that memory area in VICE using the monitor command save or short s. It takes the path to where you want to save the file, then a 0 for the host file system, then the start address and lastly the end address.
save "/path/to/wherever/the/fuck/you/want/your/fairlight.prg" 0 c000 cfffAlright, time for a test! Let's drop that newly created file into VICE and see what happens.
Why doesn't it work? Well, when we saved the file, we stripped the BASIC program that starts the intro. But everything should be still there, so let's type in SYS2064 to run the code.
Success! \o/
All done. Thanks for reading this article. Roll the credits.

...
Wait.
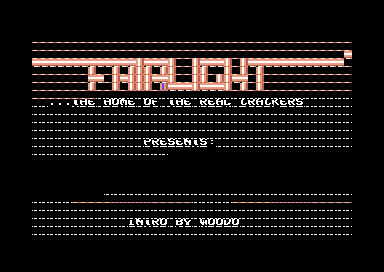
Why didn't that scroller start at the beginning of the text like it should?
That doesn't look right.
Yup. That's because we saved code that was already running and changing data in memory. Depending on the time it took us to save the file after starting the intro, a lot might have changed since. Like the position of the scrolltext, or the fake rasterbars, or the music. We can't be sure what the initial state was and in some cases the program might not work at all anymore.
Success? More like sucks ass.

Let's try a different approach.
Unpacking method 2: tracing the unpacker code
The trick here will be to let the unpacker do its work like before but insert a command that prevents execution right where it would otherwise jump to the intro. It is important that the program has not been started yet, that's why I explained earlier how to load the PRG without running it. Let's start by looking for a JMP $C000 or JSR $C000 in memory.
h 0000 ffff 4c 00 c0      ; JMP $C000
h 0000 ffff 20 00 c0      ; JSR $C000
.C:08e6 20 00 C0 JSR $C000Ha! There is our jump command. Let's change the $20 to $60 (RTS)
>08e6 60 For the fun of it, since it's a quick hack, we could do the same from BASIC with a POKE command. This is basically the same method most cheat pokes for infinite lifes worked in the 80s.
POKE 2278, 96
RUN
Okay, right after running the program from basic, we are greeted with a clean screen:

This at least means that we achieved something as the intro did not start as it normally would do. If everything works as planned, we unpacked the code and left to BASIC right before executing the intro. If we type in
SYS 49152 ; 49152 = $c000 -> the memory location of the introthe intro should now start. But before we do this, we save the program again just like we did earlier.
And it does! And most of all, everything looks like it should, including the correct scroller position and all.
Breakpoints
For the sake of completeness, we look into yet another option, which is using breakpoints. With the break command you can specify any address in memory and stop execution once the program counter reaches that address.
I've run the unpacking routine and inspected the code it generated to find the right address to set the breakpoint at. I didn't mention it earlier, but the JSR $C000 actually gets copied to a different location before execution and we have to find that address where it got copied to.
Here it is:
.C:019e 20 00 C0 JSR $C000Setting a breakpoint works like this:
break 019e
BREAK: 1  C:$019e  (Stop on exec)
To verify if it works, we repeat the process as before:
- reset the emulator
- load the program
- enter monitor
- set the breakpoint
- exit the monitor
- run the BASIC program.
- save the program
- (in monitor) find a
RTSand continue execution from thereg 0870 - execute the intro with
SYS 49152
Yes! The result is the same as with the previous method. I've shown you both approaches since either can come in handy. Now that we have done our homework and learned how to do it manually, we can lean back and check out a tool that does this automatically for us.
What?
I'm sorry, didn't get that...
Ahh, yes yes, automatically...
No. Right, that is not neede... what?
Why?
Oh, you mean, err.., I should have shown you the most convenient solution first?

Unpacking method 3: Unp64
Unp64 is a generic C64 unpacker and it works surprisingly well. Here's how the developer Ian Coog describes it:
The process is quite similar to what we did manually. That means if you followed the instructions closely, you can now apply for a job as an unpacker. Teach a man how to fish...
The downloaded ZIP file of Unp64 containes an executable file for Windows only. But gladly a Makefile is included as well, so you can build your own Mac or Linux version by simply running
> makein the terminal. After about a minute you should have the right executable file for your operating system.
Using Unp64 is super simple, but check out the documentation to understand all the extra options. In our case, we make sure Unp64 and the Fairlight intro are in the same folder (it's just easier) and then run
> unp64 flt-01.prg

ECA Compacker, unpacker=$0100
Entry point: $0811
pass1, find unpacker: $0100
pass2, return to mem: $c000
saved $c000-$cfff as flt-01.prg.c000
Wow. That's... impressive. I love when logical assumptions transformed into code yield such great results. Since we've done it the hard way ourselves, we can appreciate it even more. The converted program was saved as flt-01.prg.c000 and should be identical to the versions we created manually.
The unpacking is done. We can finally look into disassembling the code.
Phew.

Disassembly
I'm done praising this "oh so iconic masterpiece of a C64 cracktro, which massively influenced the demo scene which itself has become accepted as UNESCO cultural heritage". After all, Woodo was probably like 12 years old when he coded this, half acne, half chips & coke farts. I, for one, am in my mid fourties, a serious, well respected and adorable decent human being, who's in no way in a mid-life crisis.
Where was I... ah yes, disassembling the Fairlight intro.
The uncompressed binary file
By now you should have your own unpacked file, if not, you can just grab it from this github repo. If you plan to follow the steps and disassemble the binary file yourself, many disassemblers out there, like Regenerator or masswerk's 6502 disassembler, are great choices. Chances are they work just a tad better and are more user friendly than my disassembler pyDisass6502. On the other hand, pyDisass6502 lets you adapt the code of the disassembler itself and is quite easy to understand. I've configured pyDisass6502 to run from any directory, instructions can be found in the repo's readme.md file.
Development environment
VSCode is a great IDE for cross platform development. It works remarkably well and it's free. I've created the ACME Assembler VSCode Template for easy development, supporting Windows, Linux and Mac. I've also included the full configuration including the ACME Assembler and exomizer binaries in the repository for the Fairlight intro. This should help you get started without any hazzle, yet if you are already familiar with other cross platform tools it should be easy to adapt.
Start Code
The Fairlight intro code starts at address $c000 and in the previous step we stripped the BASIC starter. To make the disassembly process more convenient, the following code adds a BASIC starter again and then loads in the converted assembly code.
;==========================================================
; created by awsm of Mayday! in 2021
; starter for fairlight intro
;==========================================================

;==========================================================
; labels
;==========================================================

BASIC           = $0801
CODE_START      = $c000


;==========================================================
; BASIC header
;==========================================================

* = BASIC

    !byte $0b, $08
    !byte $E5                     ; BASIC line number:  $E2=2018 $E3=2019 etc
    !byte $07, $9E
    !byte '0' + CODE_START % 100000 / 10000
    !byte '0' + CODE_START %  10000 /  1000
    !byte '0' + CODE_START %   1000 /   100
    !byte '0' + CODE_START %    100 /    10
    !byte '0' + CODE_START %     10
    !byte $00, $00, $00           ; end of basic


;==========================================================
; main program
;==========================================================

!source "code/flt.asm"
This gives us this nice little line of BASIC code, which starts the intro by calling SYS 49152, which in hex, you guessed it, is $C000.
With the project neatly set up, it's time to let our disassembler go wild!
Disassembly, round 1: first automatic conversion
Our project structure:
bin/                      ; contains ACME & exomizer files for each OS
    linux/
    mac/
    win/
build/                    ; output directory
code/                     ; our source code lives here
    flt.asm               ; the generated file
    main.asm              ; the BASIC starter
sources/                  ; external files
    entrypoints.json      ; our custom entrypoints file
    flt.prg               ; the source binary
make.sh                   ; the make file which handles compiling and starting VICE
All ready to go, let's start with the first disassembly attempt!
disass -i sources/flt.prg -o code/flt.asmThis takes sources/flt.prg as the input and generates code/flt.asm.
Here are the first lines of generated code:
; converted with pydisass6502 by awsm of mayday!

* = $c000

            sei
            lda #$c1
            sta $0315                       ; IRQ vector routine high byte
            lda #$74
            sta $0314                       ; IRQ vector routine low byte
            lda #$01
            sta $d012                       ; raster line
            sta $d01a                       ; interrupt control
            lda #$7f
            sta $dc0d                       ; CIA #1 - interrupt control and status
            lda #$1b
            sta $d011                       ; screen control register #1, vertical scroll
            lda #$94
            sta $dd00                       ; CIA #2 - port A, serial bus access
            lda #$12
            sta $d018                       ; memory setup
            lda #$09
            ldx #$00
Pretty cool! The disassembler converted the file without errors and we can see both code and data sections. As a bonus, many lines of code have comments added automatically! You can actually deactivate those comments if you do not like or need them by adding the flag -nc or --nocomments.
However, since our disassembler follows the rule "when in doubt, assume it's data", the majority of the file looks like this:
lc0f1

!byte $1f, $8d, $18, $d4, $a9, $98, $a2, $00, $cd, $12, $d0
!byte $d0, $fb, $bd, $80, $c2, $a8, $ad, $12, $d0, $cd, $12
!byte $d0, $f0, $fb, $8c, $21, $d0, $e8, $e0, $2a, $d0, $ec
!byte $ad, $12, $d0, $c9, $d2, $d0, $f9, $a5, $09, $8d, $16
!byte $d0, $a2, $64, $ca, $d0, $fd, $a9, $d8, $8d, $16, $d0
!byte $c6, $09, $a5, $09, $c9, $ff, $d0, $2c, $a9, $07, $85
!byte $09, $a2, $00, $bd, $21, $c7, $9d, $20, $c7, $e8, $e0
!byte $27, $d0, $f5, $a2, $00, $a1, $39, $8d, $47, $c7, $e6
!byte $39, $a5, $39, $c9, $00, $d0, $0c, $e6, $3a, $a5, $3a
!byte $c9, $cc, $d0, $04, $a9, $ca, $85, $3a, $ad, $20, $db
!byte $48, $a2, $00, $bd, $21, $db, $9d, $20, $db, $e8, $e0
!byte $27, $d0, $f5, $68, $8d, $47, $db, $4c, $31, $ea, $a9
!byte $01, $8d, $19, $d0, $ad, $f1, $c0, $c9, $1f, $d0, $07
!byte $20, $e4, $ff, $c9, $20, $f0, $06, $20, $e4, $ff, $4c
!byte $b7, $c0, $78, $a9, $ea, $8d, $15, $03, $a9, $31, $8d
!byte $14, $03, $20, $81, $ff, $a9, $97, $8d, $00, $dd, $58
!byte $4c, $e2, $fc, $00, $00, $00, $00, $00, $00, $00, $00
Interestingly, since the compiler wouldn't care or even know if the code or data makes any sense, this would successfully compile even if the above section is code or just partly code.
But we are humans, not compilers. If some of you out there are actually compilers, congrats. I'll try my best to make this article interesting for you, too. But for now, we need to focus on humans, who, sadly, can't make shit out of this data gibberish. Humans need more guidance. So let's take care of that next.
Disassembly, round 2: Inspect the data
From here on, we help the disassembler identify code sections by marking them manually, if they are known. This is where the entrypoints.json file, which is part of pyDisass6502, comes in handy:
{
    "entrypoints": [
        {"addr": "", "mode": "code"}
    ]
}
The usage is pretty simple. Whenever we find code hidden in the data section, we add an entrypoint to the JSON file. pyDisass6502 will acknowledge these when setting the -e or --entrypoints flag and run the script again, like so:
disass -i sources/flt.prg -o code/flt.asm -e sources/entrypoints.jsonBut how do we identify code in the first place?
Many disassemblers have an interactive UI, which lets you mark sections and convert them between code and data. Our command line tool does not have that luxury, but luckily we can always look into the monitor of the VICE emulator. I usually keep it open all the time to browse through the code and set manual entrypoints whenever I spot code.
The first entrypoint is easy to identify if you look at the start of the code again:
            lda #$c1
            sta $0315                       ; IRQ vector routine high byte
            lda #$74
            sta $0314                       ; IRQ vector routine low byte
The IRQ vector is changed to jump to $c174, which is our custom interrupt routine and therefore has to be code. Our disassembler wasn't smart enough to look for high and low byte addresses, but we humans are! GO HUMANS! GO HUMANS! This easily means it's now a tie between compilers and humans.
Our entrypoints file:
{
    "entrypoints": [
        {"addr": "c174", "mode": "code"}
    ]
}
We start the disassembly again, et voilá! Out of the sea of data emerges our custom interrupt routine:
lc174
            lda #$01
            sta $d019                       ; interrupt status
            lda lc0f1
            cmp #$1f
            bne lc187
            jsr $ffe4                       ; GETIN
            cmp #$20
            beq lc18d


lc187
            jsr $ffe4                       ; GETIN
            jmp lc0b7


lc18d
            sei
            lda #$ea
            sta $0315                       ; IRQ vector routine high byte
            lda #$31
            sta $0314                       ; IRQ vector routine low byte
            jsr $ff81                       ; SCINIT
            lda #$97
            sta $dd00                       ; CIA #2 - port A, serial bus access
            cli
            jmp $fce2
Even cooler, like in a chain reaction, the disassembler found more jump and branch addresses in this code section and those turned into code as well. \o/ - it's a bit like playing minesweeper, just even more boring.
From here on, I just look at suspicious areas and cross reference them with the monitor output of VICE. Take this section for example:
lc0af
            jmp lc0af

!byte $a9, $01, $8d, $19, $d0

lc0b7
            jsr lcc5e
The conservative approach of the disassembler marks anything after a jmp as data. And rightly so. But in this case, the following bytes are not accessed from anywhere in the (currently converted) code, which you can conclude by the missing label, which would be lc0b2. Adding this address as an entrypoint reveals the missing code:
lc0af
            jmp lc0af


lc0b2
            lda #$01
            sta $d019                       ; interrupt status


lc0b7
            jsr lcc5e
            inc $02
            ldx $02
            lda lc2c0,x
            ldy #$0e
            [..]
And again, since we told the disassembler that we're in code land, much more data was successfully converted. At this point it is tempting to make changes to the code already, but since every rerun of the disassembler generates the file from scratch, all those changes would be lost. Make sure you're happy with the conversion result before advancing to the next step.
A less scientific yet fun method to check for unidentified code sections is to remove one byte from a data section and check if the code crashes.
lc18d
            sei
            lda #$ea
            sta $0315                       ; IRQ vector routine high byte
            lda #$31
            sta $0314                       ; IRQ vector routine low byte
            jsr $ff81                       ; SCINIT
            lda #$97
            sta $dd00                       ; CIA #2 - port A, serial bus access
            cli
            jmp $fce2

!byte $00, $00, $00, $00, $00, $00, $00, $00, $00, $00, $00
Let's remove one of the $00 bytes and check the output:
That's a clear indicator that some code hasn't been found yet and therefore the addresses aren't converted to labels. And because of that, some code could not be moved around in memory, resulting in unwanted behaviour, like this crash. The byte sequence above is unused memory though, as long as the amount of bytes is unchanged, we can replace them with any values and the intro will still run fine.
Disassembly, round 3: First compile test
So we've made some changes and it's time to try the first compilation. We start the compiler in VSCode (if you're using the ACME VSCode template) with Shift + Command + B (on Mac) and choose the build -> C64 -> VICE option. The compiler outputs some errors:
Error - File code/flt.asm, line 136 (Zone <untitled>): Value not defined (lc0f1).
Error - File code/flt.asm, line 139 (Zone <untitled>): Value not defined (lc0f1).
Error - File code/flt.asm, line 194 (Zone <untitled>): Value not defined (lc720).
Error - File code/flt.asm, line 233 (Zone <untitled>): Value not defined (lc0f1).
Error - File code/flt.asm, line 233 (Zone <untitled>): Value not defined (lc0f1).
So four of the five errors are related to the address c0f1. What's happening there?
lc0e2
            cmp #$33
            bne lc0f0
            lda lc0f1           ; loads value from $c0f1
            cmp #$1f
            beq lc0f0
            inc lc0f1           ; increases $c0f1


lc0f0
            lda #$1f            ; ah! $c0f1 is actually the memory location of #$1f
            sta $d418
            lda #$98
            ldx #$00
So, there we have it. That damn self modding code.
It's a powerful method to keep the code short, but a pain in the butt to reverse engineer. We can not set a label lc0f1, as it would be inside the lda #$1f instruction, but we can change all occurances of lc0f1 to lc0f0 + 1. The compiler wouldn't complain and for us humans it's a good reminder that we're looking at selfmodifying code.
            inc lc0f1           ; before
            inc lc0f0+1         ; after
The last reported issue is a missing label for a byte that is read, but not marked for some reason. Maybe we'll find out why later.
lc720
!byte $20
All problems fixed - let's try again!

That's a great milestone! We're actually compiling assembly code back into a fully working C64 intro! We haven't understood the code itself yet, but it's the first step. From here on we can inspect the code itself and make it more readable.

Anonymous labels
Our disassembler introduced labels, which are destination points for code jumps or data fetches. They are super useful, but can be overwhelming when you try to clean up the code. Very often these labels are just used for a code loop and not called from outside that loop. I replace those with anonymous labels, for example:
            lda #$20            ; a = $20
            ldx #$ff            ; x = $ff
loop
            sta $d800,x         ; store a at pos $d800+x
            dex                 ; x = x - 1
            cpx #$27            ; is x = $27?
            bne loop            ; no, keep looping
can be cleaned up with
            lda #$20            ; a = $20
            ldx #$ff            ; x = $ff
-
            sta $d800,x         ; store a at pos $d800+x
            dex                 ; x = x - 1
            cpx #$27            ; is x = $27?
            bne -               ; no, keep looping
A bne - jumps to the nearest previous "-" label. A bne + jumps to the next following "+" label. In addition, you can use multiple minus or plus symbols for nested branching, e.g. bne --. This greatly improves readability of the code.
Replace high and low byte indirect addresses
Most jumps to specific locations in memory are done with direct addressing, like jmp $c000. Our disassembler is smart enough to convert them to labels like jmp lc000. Indirect jumps, like our IRQ entry code, are not detected though and need to be converted.
            lda #$c1        ; high byte of IRQ address
            sta $0315
            lda #$74        ; low byte of IRQ address
            sta $0314

[..]

* = $c174                   ; IRQ address
            lda #$00
            sta $d020
This code will be replaced with the following:
            lda #>irq        ; high byte of IRQ address
            sta $0315
            lda #<irq        ; low byte of IRQ address
            sta $0314

[..]

irq                         ; IRQ address
            lda #$00
            sta $d020
Convert data to text
For better readabilty and making changes to the program easier, we can convert data sections into text. Many disassemblers have that feature built in, but my little Pony Python script doesn't know that trick yet. Thankfully, VICE features the i command for displaying memory as text. With this, I can convert the scrolltext at $ca00 to a readable format, which I use to replace the corresponding data section in our program.

scrolltext
!scr "cracked on the 21st of november 1987...   now you can train yourself "
!scr "to kill communists and iranians...    latest top pirates : beastie bo"
!scr "ys  ikari  ace  hotline  danish gold  new wizax  tpi  tlc  antitrax  "
!scr "c64cg  triad  1001 crew  yeti  triton t  fcs  sca    overseas : eagle"
!scr "soft  fbr  sol  nepa  abyss  xpb  ts  tih          pray that you will"
!scr " get an invitation to our great copy party in stockholm in december.."
!scr ".        fuckings to watcher of the silents. you'll not destroy this "
!scr "party...       l8r           "
Extracting code into separate files
So far our program is one single file that includes code, scrolltext, the charset and the music. That's okay for a program this small, but I like it neatly packaged. But where in our code is all that stuff?
Memory register $d018 comes to the rescue. In it, both the screen and character memory locations are defined, let's search our code for that address:
            lda #$12            ; = binary 0001 0010
            sta $d018
We count the bits from right to left, starting at bit #0 to bit #7. Bit 1-3 (001) define the position of the character memory relative to the VIC bank. Looking at our handy memory map reveals we need to add $0800 to the current VIC bank to locate the character data in memory. So what's the address of the VIC bank then? Again, there's a register for it, this time it's $dd00. And right above the previous code snipped we have it defined:
            lda #$94            ; = binary 1001 0100
            sta $dd00
Here, the VIC bank is defined by bits 0-1 (00), which our memory map reveals as memory location $c000. Now that we have both values, we can simply add them and tadaa, pinpoint our character memory at $c800!
For the screen memory, the process is the same, with bits 4-7 (0001) of $d018 pointing at $0400, which, with the added VIC bank location, gives us $c400. Do you feel like a real hacker now? No? Well, you should! Not just because you're reverse engineering this 35 year old code written by an eight year old, sure, that's kinda cool, but also because apparently you lack any social contacts. I mean, let's be honest, why would you still read this article otherwise? I know. Anyway, consider yourself a...
Or hackerwoman.
I would love to have hackerwomen on my blog.
Because, you know, lack of social contacts.
I provide both the assembly data (charset.asm) and the binary (charset.bin) in the github repository, they are practically identical, but only the binary file can be opened in a character editor like VChar64 or CharPad. If you want to make changes to the font, that's your most convenient option.

Screen memory
As mentioned above, the screen memory can be extracted the same way, it is located from $c400 to $c7e7 and could be saved either as binary file or as assembly data. I was surprised to see that the text on the screen was not printed using a loop routine, but the whole screen memory was just stored in the file. A lazy way of doing it, really, but working nevertheless.
I decided to convert the memory area to assembly code, combining repeating bytes like $20 for the space/empty character with ACME assembler specific !fill instructions. This makes the screen memory much more readable and easy to modify:
!fill 120, $20
; fairlight logo
!byte $00, $00, $00, $00, $00, $00, $00, $00, $00, $00, $00, $00, $00, $00, $21, $00, $00, $00, $21, $20, $20, $21, $00, $00, $00, $21, $20, $21, $00, $00, $00, $00, $00, $00, $00, $00, $00, $00, $00, $00
!byte $20, $20, $20, $20, $20, $20, $20, $20, $21, $20, $20, $21, $20, $21, $21, $21, $20, $21, $21, $20, $20, $21, $21, $20, $20, $21, $20, $21, $20, $21, $20, $20, $20, $20, $20, $20, $20, $20, $20, $20
!byte $20, $20, $20, $20, $20, $20, $20, $20, $00, $00, $20, $21, $00, $21, $21, $21, $00, $00, $21, $20, $20, $21, $21, $20, $21, $21, $00, $00, $20, $21, $20, $20, $20, $20, $20, $20, $20, $20, $20, $20
!byte $20, $20, $20, $20, $20, $20, $20, $20, $21, $20, $20, $21, $20, $21, $21, $21, $20, $21, $00, $00, $00, $21, $00, $00, $00, $21, $20, $21, $20, $21, $20, $20, $20, $20, $20, $20, $20, $20, $20, $20
!fill 43, $20
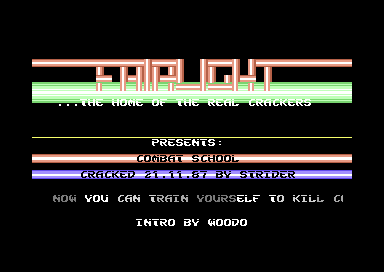
!scr "...the home of the real crackers"
!fill 180, $20
!scr "presents:"
!fill 69, $20
!scr "combat school"
!fill 60, $20
!scr "cracked 21.11.87 by strider"
!fill 87, $20
scrollline
!fill 39, $20
last_character
!byte $20
!fill 93, $20
!scr "intro by woodo"
!fill 53, $20The Fairlight logo is, as you can see, based on only two different characters, $00 and $21, a horizontal and a vertical line. Pretty efficient. You might also notice that I inserted two labels in here, scrollline and last_character. These are used in the scrolltext code.
Music
The music section is a mixture of the player code and the song data. I've separated it into an extra file as well, but other than that, I didn't even try to touch and optimize it. If you're familiar with SID music player code, you might want to check it out and see if I've left anything in there in need of fixing.
Wrapping up code conversion
With all the steps above and some trial and error, you should now have code that is mostly memory location independent (except for the fixed locations like for the character and screen data), well commented (pyDisass6502 did a lot for us automatically) and ready to be analyzed and changed. It's a great milestone in our journey as we have successfully reverse engineered and therefore preserved the original code. It is now available to inspect and learn from.
Time to create a new code branch or make a copy of the source code and make changes to it!
Optimizations
Back in 1986 assembly code was usually a bit harder to organize, it's much easier to clean up code using a modern IDE like VSCode. During code conversion I moved some code sections around, like when code jumps to an area only once during execution. That code can then be moved to the location of the jsr instruction, if there is enough memory available, effectively removing that jsr and the corresponding rts command. It helps keeping the code in order and understandable and shaves off a byte or two in the process.
; before

            lda #$01
            sta $d020
            jsr sub_routine
            [..]

sub_routine
            lda #$02
            sta $d021
            rts

; after

            lda #$01
            sta $d020
            lda #$02
            sta $d021
            [..]
Stable rasterbars
I noticed that even the slightest changes make the rasters flicker. This is a sign that the raster code isn't really stable and instead tweaked until it 🦄 magially worked! 🦄. And sure enough, if we look at the color information for the raster bars, we see that the rasters are much bigger than just the two red and blue bars:
raster_color
!byte $00, $00, $00, $00, $00, $00, $00, $00
!byte $00, $00, $00, $00, $00, $00, $00, $02
!byte $0a, $01, $01, $01, $0a, $0a, $02, $00
!byte $00, $00, $00, $00, $00, $06, $0e, $0e
!byte $01, $01, $0e, $0e, $06, $00, $00, $00
!byte $00, $00, $00, $00, $00, $00, $00, $00
!byte $00, $00, $00, $00, $00, $00, $00, $00
!byte $00, $00, $00, $00, $00, $00, $57, $59
Remove all the $00 (which represents the color 'black') and the bars would be displayed several lines higher (and flicker a lot). It seems that Woodo experimented with the amount of raster lines until he found the most stable version and then made all unwanted lines invisible. To illustrate the method, I've changed the color of the first raster line to yellow:
I removed all black lines except for the last one, which is needed for the black background of the rest of the screen.
raster_color
!byte $02, $0a, $01, $01, $01, $0a, $0a, $02
!byte $00, $00, $00, $00, $00, $00, $06, $0e
!byte $0e, $01, $01, $0e, $0e, $06, $00
raster_color_end
This required some changes to the display code, like moving the start of the raster bars to a later rasterline. However, I wasn't able to get the raster lines stable again. For the sake of doing it right, I added code for generating stable rasters, which is way beyond my paygrade and was mostly copied from this excellent (german) website: www.retro-programming.de. It's worth noting that the amount of added code exceeds the amount of bytes we saved here. On the upside, we have now much more control over the rasters and can adjust it without fearing flickering.
Our new code is more stable and works reliably (and it also gets rid of some glitchy dots, see image above), but if you just want to have a tiny intro which magically does what it is supposed to do and was fun to hack together, Woodo's way of doing it was just right. All good, Woodo, all good. I considered fixing the uneven color gradient too (the blue bar misses a white line), but decided against it to keep the visuals as original as possible.

Optimized sine table
Similar to the real rasterbars, the sinus table which stores the vertical position of the fake sprite raster seems overly long:
table_sprite_y_pos
!byte $57, $59, $5c, $5f, $61, $64, $66, $69, $6b, $6d, $6f, $71, $73, $75, $76, $78
!byte $79, $7a, $7a, $7b, $7b, $7b, $7b, $7b, $7b, $7a, $79, $78, $77, $76, $74, $73
!byte $71, $6f, $6d, $6a, $68, $65, $63, $60, $5e, $5b, $58, $56, $53, $50, $4e, $4b
!byte $48, $46, $43, $41, $3f, $3d, $3b, $39, $38, $36, $35, $34, $33, $32, $32, $32
!byte $32, $32, $32, $32, $33, $34, $35, $36, $38, $39, $3b, $3d, $3f, $41, $43, $46
!byte $48, $4b, $4e, $50, $53, $56, $58, $5b, $5e, $60, $63, $65, $68, $6a, $6d, $6f
!byte $71, $73, $74, $76, $77, $78, $79, $7a, $7b, $7b, $7b, $7b, $7b, $7b, $7a, $7a
!byte $79, $78, $76, $75, $73, $71, $6f, $6d, $6b, $69, $66, $64, $61, $5f, $5c, $59
!byte $57, $54, $51, $4e, $4c, $49, $47, $44, $42, $40, $3e, $3c, $3a, $38, $37, $35
!byte $34, $33, $33, $32, $32, $32, $32, $32, $32, $33, $34, $35, $36, $37, $39, $3a
!byte $3c, $3e, $40, $43, $45, $48, $4a, $4d, $4f, $52, $55, $57, $5a, $5d, $5f, $62
!byte $65, $67, $6a, $6c, $6e, $70, $72, $74, $75, $77, $78, $79, $7a, $7b, $7b, $7b
!byte $7b, $7b, $7b, $7b, $7a, $79, $78, $77, $75, $74, $72, $70, $6e, $6c, $6a, $67
!byte $65, $62, $5f, $5d, $5a, $57, $55, $52, $4f, $4d, $4a, $48, $45, $43, $40, $3e
!byte $3c, $3a, $39, $37, $36, $35, $34, $33, $32, $32, $32, $32, $32, $32, $33, $33
!byte $34, $35, $37, $38, $3a, $3c, $3e, $40, $42, $44, $47, $49, $4c, $4e, $51, $54
The reason here is pure lazyness in my view. We are looking at 16*16 = 256 bytes and the code loops through the table by wrapping Y (from $00 to $ff again) constantly. With a slight tweak to the code, I removed that restriction:
            inx
            cpx #raster_color_end - raster_color
            bne draw_rasterbars
Setting a start and an end label before and after a table is a neat trick to get the right value to check against automatically instead of counting the bytes and adapt the code whenever the amount changes.
table_sprite_y_pos
!byte  87,  89,  92,  95,  97, 100, 102, 105, 107, 109, 111, 113, 115, 116, 118, 119
!byte 120, 121, 122, 122, 123, 123, 123, 123, 122, 122, 121, 120, 119, 117, 116, 114
!byte 112, 110, 108, 106, 103, 101,  98,  96,  93,  91,  88,  85,  82,  80,  77,  75
!byte  72,  70,  67,  65,  63,  61,  59,  57,  56,  54,  53,  52,  51,  51,  50,  50
!byte  50,  50,  51,  51,  52,  53,  54,  55,  57,  58,  60,  62,  64,  66,  68,  71
!byte  73,  76,  78,  81,  84,  87
table_sprite_y_pos_end
You may notice that the new table data has not only become much shorter, but has different values as well. Why? I noticed that the original sinus table wasn't as smooth as it could be and since I had to change it anyway I figured I could just as well create a better one. I used this sinus table generator and tweaked the values to my requirements (top and bottom Y position) with a Python script, which you'll find in the repo's 'tools' folder. I find Python ideal for little tasks like this.
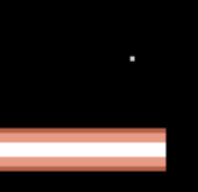
As mentioned earlier the rasterbar effect is actually just sprites. By adding a txa in the sprite setup loop we can make this very clearly visible:
![]()
Ah, good we did this, otherwise we wouldn't have spotted another glitch in the code: all eight sprites are used, but only seven are needed to fill the screen with double width sprites: 320 / 48 = 6.6. I noticed this, because after the color red ($02) always comes cyan ($03), not purple ($04). And with just seven sprites used, the last sprite color should be blue ($06), not yellow ($07). And sure enough, the sprite setup routine skipped a sprite right here:
            lda #$78
            sta $d004                       ; sprite #2 X position (bits 0-7)
            lda #$a8
            sta $d008                       ; sprite #4 X position (bits 0-7)
            lda #$d8
            sta $d00a                       ; sprite #5 X position (bits 0-7)
I added the missing sprite, removed the last sprite and adapted the sprite movement routine. Now we have one sprite less to move around which we could use for other effects if we wanted.
![]()
Variable scrolltext length
The length of the scrolltext was also hardcoded:
            inc $3a
            lda $3a
            cmp #$cc
$3a contains the high byte of the current scrolltext position in memory. As soon as the scrolltext position reaches $cc00 the text position resets. This not only makes it difficult to move the scrolltext to a different memory location, it also explains why Woodo had to use so many empty characters in his message:
scrolltext
!scr "cracked on the 21st of november 1987...   now you can train yourself "
!scr "to kill communists and iranians...    latest top pirates : beastie bo"
!scr "ys  ikari  ace  hotline  danish gold  new wizax  tpi  tlc  antitrax  "
!scr "c64cg  triad  1001 crew  yeti  triton t  fcs  sca    overseas : eagle"
!scr "soft  fbr  sol  nepa  abyss  xpb  ts  tih          pray that you will"
!scr " get an invitation to our great copy party in stockholm in december.."
!scr ".        fuckings to watcher of the silents. you'll not destroy this "
!scr "party...       l8r           "
I corrected this issue by rewriting parts of the scrolltext code:
            lda ($39,x)                     ; fetch a new character
            cmp #$00                        ; is the current byte = $00?
            bne +                           ; yes, then reset the scrolltext
Instead of the position in memory, we now check for the value of the current character. To make it work, I just add !byte $00 at the end of the scrolltext. The only downside of this approach is that we can't use character $00 in our scrolltext, which, in our case, would be a graphic character from the logo anyway. On the upside, our scrolltext can now be as short or long as we like.
This concludes our code optimizations. We have made this lovely intro quite a bit more versatile. I find it reassuring in a way to learn about some dirty tricks and hacks that have been used. After all, quite a bit of duct tape was used to hold the intro together.
Remix
Now that we finally have full control over every single byte of the code, we can change whatever we want and turn the intro into our own remix. There's almost no limit to your imagination and this intro serves as a great template for your own creativity. I didn't want to go way beyond with this, I made some artistic changes but kept the rest close to the original. It is still the famous Fairlight intro, after all.
That's it. We're finally done with this. It was a fun ride for me and I've learned a ton from analyzing Woodo's code. Thanks Woodo! There's much more I could have optimized and many of my explanations and methods described here could be considered inefficient or at least not ideal. I still consider myself a beginner when it comes to writing 6502 assembly code. That's why I love learning from the best.
Feel free to suggest improvements or share your best practices in the comments below. Also if you find any bugs or want to contribute to the disassembled code, submit an issue or a pull request. And of course now you can make your very own version of the famous Fairlight intro - it's all there.
But most of all: Thank you for reading this article.
I hope you liked it :)
Would you like me to disassemble and explain another intro? Let me know in the comments :)