A 6502 disassembler in Python
on Sun Mar 21 2021 by Ingo HinterdingIn this article I share some learnings about disassembling 6502 machine code. Turns out getting it to work around 80% is easy, improving to 90% is tricky and making it work 100% of the time almost impossible.
The Commodore 64 computer is without any doubt a timeless classic. Therefore it wouldn't surprise me if you read this article sometime in the future from today. Maybe flying cars have finally become a thing. Maybe doge coins became the prime planetary currency. Or even bolder, it is the year of Linux on the desktop. Wild. But, it's probably much more likely that humanity has succeeded in terraforming earth into a second deadly, dusty mars.
For me, it's the year 2021. We have just survived the first incarnation of evil emperor Trump and we're celebrating just over one year of being stuck in a fucking global pandemic which started as a fairly deadly virus but later on mutated into a much more dangerous brain slug that skyrocketed critical cases of baffling stupidity amongst the population, resulting in a never ending groundhog day. Oh boy.
Where was I... ah, yes, writing a disassembler.
The Mac, the modern version of the Commodore 16
My first computer was a C16 and I credit this fact that I have a passion for and profession in programming. From those kids in my school who owned a home computer in the mid 80s, most of them had a C64. I watched them sharing the coolest games all the time while I just had... Winter Games and Ghost Town. But my computer featured something that was much better than games, it had the amazing BASIC 3.5, which was far superior to the 64's BASIC 2.0. So I created my own very shitty games.
The situation is similar with today's retro tooling support for the Apple Mac. Most good programs are made for Windows machines and getting them to work on Linux or Mac would require Wine or running a resource demanding virtual machine. In fact, the last time I wanted to create a new game for the C64 I couldn't find a good native sprite editor and because of that on that day spritemate was born. The same is true for disassemblers. There are some amazing ones for Windows, like Regenerator and even web based solutions like masswerk's 6502 disassembler. But my goldfish brain thought "hmmm... how hard can it be to write my own disassembler?"
Being stuck at home due to a torn calf muscle fiber I decided to train my rusty assembly knowledge and work on a little project. I wanted to do a full disassembly of one of the most iconic C64 cracktros ever made, the famous fairlight intro:
The intro is pretty straightforward with a custom charset, a nice SID tune, a soft scroller and some color washing. Even the rasterbars are simple as they are in fact no rasterbars at all but simply sprites.
Assembling in a nutshell
Assembling (also called compiling) is converting program code into a machine language program. Let's do a simple example:
      lda #$02          ; load the value $02 into the accumulator
      sta $d020         ; store the value at memory address $d020
      rts               ; return (to BASIC)
When executed on the C64, this code would turn the border color (d020) to red ($02).
These commands (lda for LoaD Accumulator and sta for STore Accumulator) are called mnemonics. The machine would not actually understand these natively, but they are represented by eight bit long hexadecimal numbers from 00 to ff, called opcodes. Let's add those opcodes to the listing:
    A9 02     lda #$02          ; load the value $02 into the accumulator
    8D 20 D0  sta $d020         ; store the value at memory address $d020
    60        rts               ; return (to BASIC)
A9 represents lda, 8D is for sta and 60 is the equivalent of the rts mnemonic. If you wonder how D020 became 20 D0, that's because of the so called little endian notation, which puts the least significant byte in front. A nice punch in the gut whenever I try to debug my code.
The whole program would reside in the computer's memory as this short sequence of hex numbers:
A9 02 8D 20 D0 60 Have you every wondered how computers do so much magic just by routing current (1) or no current (0) through their circuits? Well, convert the numbers above into binary notation and you can literally see the matrix:
10101001 00000010 10001101 00100000 11010000 01100000
To sum it up, writing an assembler is not that hard. You convert mnemonics into opcodes, take care of the little endian notation and you're almost ready to go. It goes without saying that I'm oversimplifying the process here, but you get the idea.
Disassembling in a nutshell
Disassembling is converting machine code back into a readable assembly program. Simple as that.
It's the process of converting
A9 02 8D 20 D0 60 into
      lda #$02
      sta $d020
      rts
If we approach the task with pseudo code, could it be as simple as this?
  get a byte (opcode)
  replace the byte with the mnemonic representation of it
  repeat
Not quite. The result would look like this:
      lda
      jam
      sta
      jsr
      bne
      rts
Our data would be interpreted as code, resulting in jibberish that no compiler would accept as a valid program. This brings us to our biggest challenge when writing a disassembler.
Distinguishing code from data (part I)
It is important to understand that the 6502 instruction set has different addressing modes. These describe the actual behavior and tell us how to interpret the data that follows the mnemonic. For the lda mnemonic there are eight different addressing modes:
  A1  lda ($hh,x)   ; X-indexed, indirect
  A5  lda $hh       ; zeropage
  A9  lda #$hh      ; immediate
  AD  lda $hhll     ; absolute
  B1  lda ($hh),y   ; indirect, Y-indexed
  B5  lda $hh,x     ; zeropage, X-indexed
  B9  lda $hhll,y   ; absolute, Y-indexed
  BD  lda $hhll,x   ; absolute, X-indexed
I won't explain those in detail, there are great websites that already do this much better than I can, like Easy 6502 by skilldrick, just note that there are 13 different addressing modes in total:
A	Accumulator
abs	absolute
abs,X	absolute, X-indexed
abs,Y	absolute, Y-indexed
#	immediate
impl	implied
ind	indirect
X,ind	X-indexed, indirect
ind,Y	indirect, Y-indexed
rel	relative
zpg	zeropage
zpg,X	zeropage, X-indexed
zpg,Y	zeropage, Y-indexed
6502 legal opcodes
And here you see all legal instructions of the 6502 (table chart courtesy of the excellent website masswerk). There are illegal opcodes as well, those fill in the blank spots in the chart. Some of them can be used for special tricks, others would just crash the program.
| ‐0 | ‐1 | ‐2 | ‐3 | ‐4 | ‐5 | -6 | ‐7 | ‐8 | ‐9 | ‐A | ‐B | ‐C | ‐D | ‐E | ‐F | |
|---|---|---|---|---|---|---|---|---|---|---|---|---|---|---|---|---|
| 0‐ | BRK impl | ORA X,ind | ORA zpg | ASL zpg | PHP impl | ORA # | ASL A | ORA abs | ASL abs | |||||||
| 1‐ | BPL rel | ORA ind,Y | ORA zpg,X | ASL zpg,X | CLC impl | ORA abs,Y | ORA abs,X | ASL abs,X | ||||||||
| 2‐ | JSR abs | AND X,ind | BIT zpg | AND zpg | ROL zpg | PLP impl | AND # | ROL A | BIT abs | AND abs | ROL abs | |||||
| 3‐ | BMI rel | AND ind,Y | AND zpg,X | ROL zpg,X | SEC impl | AND abs,Y | AND abs,X | ROL abs,X | ||||||||
| 4‐ | RTI impl | EOR X,ind | EOR zpg | LSR zpg | PHA impl | EOR # | LSR A | JMP abs | EOR abs | LSR abs | ||||||
| 5‐ | BVC rel | EOR ind,Y | EOR zpg,X | LSR zpg,X | CLI impl | EOR abs,Y | EOR abs,X | LSR abs,X | ||||||||
| 6‐ | RTS impl | ADC X,ind | ADC zpg | ROR zpg | PLA impl | ADC # | ROR A | JMP ind | ADC abs | ROR abs | ||||||
| 7‐ | BVS rel | ADC ind,Y | ADC zpg,X | ROR zpg,X | SEI impl | ADC abs,Y | ADC abs,X | ROR abs,X | ||||||||
| 8‐ | STA X,ind | STY zpg | STA zpg | STX zpg | DEY impl | TXA impl | STY abs | STA abs | STX abs | |||||||
| 9‐ | BCC rel | STA ind,Y | STY zpg,X | STA zpg,X | STX zpg,Y | TYA impl | STA abs,Y | TXS impl | STA abs,X | |||||||
| A‐ | LDY # | LDA X,ind | LDX # | LDY zpg | LDA zpg | LDX zpg | TAY impl | LDA # | TAX impl | LDY abs | LDA abs | LDX abs | ||||
| B‐ | BCS rel | LDA ind,Y | LDY zpg,X | LDA zpg,X | LDX zpg,Y | CLV impl | LDA abs,Y | TSX impl | LDY abs,X | LDA abs,X | LDX abs,Y | |||||
| C‐ | CPY # | CMP X,ind | CPY zpg | CMP zpg | DEC zpg | INY impl | CMP # | DEX impl | CPY abs | CMP abs | DEC abs | |||||
| D‐ | BNE rel | CMP ind,Y | CMP zpg,X | DEC zpg,X | CLD impl | CMP abs,Y | CMP abs,X | DEC abs,X | ||||||||
| E‐ | CPX # | SBC X,ind | CPX zpg | SBC zpg | INC zpg | INX impl | SBC # | NOP impl | CPX abs | SBC abs | INC abs | |||||
| F‐ | BEQ rel | SBC ind,Y | SBC zpg,X | INC zpg,X | SED impl | SBC abs,Y | SBC abs,X | INC abs,X |
Now we have all the information we need to identify how many bytes that follow the instruction are data.
    A9    ; A9 = LDA immediate, expects one more byte
    02    ; 02 must therefore be a data byte
    8D    ; 8D = STA absolute, expects two more bytes
    20    ; 20 must be data
    D0    ; D0 must be data (and be switched in position with the previous byte because of little endian notation)
    60    ; 60 = RTS implied, expects no further byte
opcodes.json
There are 256 (0 to 255, or ff in hex notation) opcodes possible for the 6502 processor, but only 151 of them are defined instructions that produce an expected behavior. The other 105 are called illegal opcodes. If you want to learn more about these, I highly recommend the excellent article How MOS 6502 Illegal Opcodes really work by Michael Steil.
The first (and tedious) step for my disassembler was to make these opcodes available for parsing the code. I decided for a simple JSON file, which includes all 256 opcodes. Here are the first lines (all code can be download from my github repository).
{
  "00": {
    "ins": "brk"
  },
  "01": {
    "ins": "ora ($hh,x)"
  },
  "02": {
    "ins": "jam",
    "ill": 1
  },
  "03": {
    "ins": "slo ($hh,x)",
    "ill": 1
  },
  "04": {
    "ins": "slo ($hh),y",
    "ill": 1
  },
  "05": {
    "ins": "ora $hh"
  },
  "06": {
    "ins": "asl $hh"
  },
  "07": {
    "ins": "slo $hh"
  },
  "08": {
    "ins": "php"
  },
  "09": {
    "ins": "ora #$hh"
  },
  "0a": {
    "ins": "asl"
  },
  "0b": {
    "ins": "anc #$hh",
    "ill": 1
  },
  "0c": {
    "ins": "nop $hhll",
    "ill": 1
  },
  "0d":{
    "ins": "ora $hhll"
  },
  "0e":{
    "ins": "asl $hhll"
  },
  "0f": {
    "ins": "slo $hhll",
    "ill": 1
  }
}
I can therefore write code in python like
ins = opcodes["a9"] # returns lda #$hhand get an object with the instruction. By checking for hh and ll I can easily identify how many of the following bytes are data associated to this instruction. I could have included that information in the JSON data as well, but considered it redundant. In addition to the instruction, I use ill to mark an illegal opcode and rel to mark a relative branching instruction (more on that later).
The first version
Here's a simplified version of the python code that reads in a byte, checks for the matching opcode, takes care of the following data bytes and constructs a proper line of assembly.
def bytes_to_asm(startaddr, bytes, opcodes):
    """
    inspects byte for byte and converts them into
    instructions based on the opcode json
    returns an array with objects for each code line
    """
    asm = []
    pc = 0
    end = len(bytes)
    while pc < end:
        byte = bytes[pc]
        opcode = opcodes[number_to_hex_byte(byte)]
        instruction = opcode["ins"]
        memory_location_hex = number_to_hex_word(startaddr + pc)
        byte_sequence = []
        byte_sequence.append(byte)

        instruction_length = 0
        if "hh" in instruction:
            instruction_length += 1
        if "ll" in instruction:
            instruction_length += 1

        if instruction_length == 1:
            pc += 1
            high_byte = bytes[pc]
            instruction = instruction.replace("hh", number_to_hex_byte(high_byte))
            byte_sequence.append(high_byte)

        if instruction_length == 2:
            pc += 1
            low_byte = bytes[pc]
            pc += 1
            high_byte = bytes[pc]

            # replace with new word
            instruction = instruction.replace("hh", number_to_hex_byte(high_byte))
            instruction = instruction.replace("ll", number_to_hex_byte(low_byte))

            # store the bytes - we might need them later
            byte_sequence.append(low_byte)
            byte_sequence.append(high_byte)

        line = {
            "a": memory_location_hex,
            "b": byte_sequence,
            "i": instruction
        }

        asm.append(line)
        pc = pc+1

    return asm
Let's run our first test!
Again our little example program, including the start address, which defines where in the C64's memory the program would be stored:
* = $0810

        lda #$02
        sta $d020
        rts
Our program will now be compiled using the ACME assembler. I'm using my ACME Assembler VSCode Template for development, supporting Windows, Linux and Mac. Loading the PRG into the VICE emulator and starting the program with sys 2064 (which in hexadecimal would be 0810) we see the nice red border.
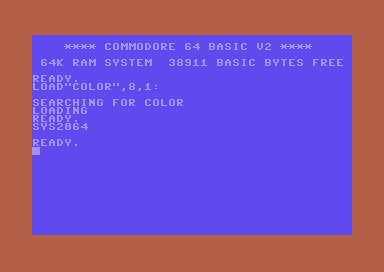
Can we disassemble the machine code binary and turn it back into readable code?
> python3 disass.py color.prg output.asmThis generates a python array
[
  {'a': '0810', 'b': [169, 2], 'i': 'lda #$02'},
  {'a': '0812', 'b': [141, 32, 208], 'i': 'sta $d020'},
  {'a': '0815', 'b': [96], 'i': 'rts'}
]
And sure enough after formatting the data the resulting output file would read like this:
; converted with disass6502 by awsm of mayday!

* = $0810
            lda #$02
            sta $d020
            rts
Adding Labels
Getting our basic program to disassemble was a great first step, but there's much more to be done to turn this into something useful. Let's modify our program a bit by introducing a jump to a different position in the code
* = $0810

loop
        inc $d020
        jmp loop
The result would be an endless loop of increasing the border color:
The compiler will generate this program:
$0810  EE 20 D0    inc $D020
$0813  4C 10 08    jmp $0810
Our disassembler would still work fine, but we can make it quite a bit more versatile by replacing memory jump addresses that are within our own code range (e.g. $0810 to $0816 in the example above) with labels. Labels are references to memory locations. It might not look that important in this example, but if we don't do this, our disassembled program could break with any change that moves code to a different address. We would be extremely limited. Let's add labels.
Labels work pretty straightforward, here's the pseudo code:
Is the address absolute (like $hhll)?
  If yes, is it within our code?
    If yes, replace it with a label
For the code above, this would mean:
$0810  inc $D020    ; $d020 is NOT an address in our program, do not replace it
$0813  jmp $0810    ; $0810 IS an address in our program, replace it with the label 'x0810'
But we're not done yet, we must also add the label for the destination of the jump.
Read the current address
  Is the current address within an array we created with all our labels we defined earlier?
    If yes, add the label before the instruction
With both in place our output would now be:
* = $0810

x0810
        inc $d020
        jmp x0810
Which is amazing, because we could change the code now or even move it to a different location in memory and it would still run perfectly fine! \o/
Adding Relative Branching
As our disassembler gets smarter we can throw a new challenge at it, which is relative branching. With the jmp $0810 instruction before we had an absolute address that we could replace by a label. But this wouldn't work for the branching instructions of the 6502, which are BPL, BMI, BVC, BVS, BCC, BCS, BNE and BEQ. Here's a little program with branching:
* = $0810

            ldy #$07      ; load 07 into the Y register
loop
            tya           ; copy Y into the accumulator
            sta $0400,y   ; store the accumulator at $0400 + whatever Y is
            dey           ; decrease Y by one
            bne loop      ; if Y is NOT zero, jump to 'loop'
            rts           ; Y is zero, exit to BASIC
The program stores bytes $00 - $07 at memory location $0400 - $0407, which is the screen, resulting in the letters ABCDEFG (plus an empty character) to be printed in the top left corner.
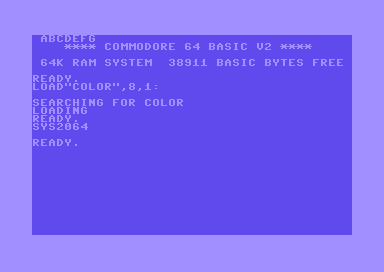
Looking into the memory using VICE's monitor command it shows:
.C:0810  A0 07       LDY #$07
.C:0812  98          TYA
.C:0813  99 00 04    STA $0400,Y
.C:0816  88          DEY
.C:0817  D0 F9       BNE $F9
.C:0819  60          RTS
One would expect the BNE command to read BNE $0812, but it's BNE $F9! That's because it branches relative to it's own position. Branching instructions can only jump forward 127 bytes or backward 127 bytes. In our example we would jump back 6 bytes: from address $0818 to address $0812. We do that by starting with $ff (255) and subtracting 6, so it's $F9 (249). If we would jump forward, we would add 6 to $00, resulting in $06.
With that knowledge we can add a check in the code for relative branching. Here's the full python function including the previous label checking, adding information about illegal opcodes and a check for the end of the file.
def bytes_to_asm(startaddr, bytes, opcodes):
    """
    inspects byte for byte and converts them into
    instructions based on the opcode json
    returns an array with objects for each code line
    """
    asm = []
    pc = 0
    end = len(bytes)
    label_prefix = "x"
    while pc < end:
        byte = bytes[pc]
        opcode = opcodes[number_to_hex_byte(byte)]
        instruction = opcode["ins"]

        # check for the key "rel" in the opcode json
        # which stands for "relative addressing"
        # it is needed e.g. for branching like BNE, BCS etc.
        if "rel" in opcode:
            is_relative = True
        else:
            is_relative = False

        memory_location_hex = number_to_hex_word(startaddr + pc)
        label = label_prefix + memory_location_hex
        byte_sequence = []
        byte_sequence.append(byte)

        instruction_length = 0
        if "hh" in instruction:
            instruction_length += 1
        if "ll" in instruction:
            instruction_length += 1

        # would the opcode be longer than the file end? then set length to 0
        if pc + instruction_length > end:
            instruction_length = -1

        if instruction_length == 1:
            pc += 1
            high_byte = bytes[pc]

            # if a relative instruction like BCC or BNE occurs
            if is_relative:
                if high_byte > 127:
                    # substract (255 - highbyte) from current address
                    address = number_to_hex_word(
                        startaddr + pc - (255 - high_byte))
                else:
                    # add highbyte to current address
                    address = number_to_hex_word(
                        startaddr + pc + high_byte + 1)
                instruction = instruction.replace(
                    "$hh", label_prefix + address)
            else:
                instruction = instruction.replace(
                    "hh", number_to_hex_byte(high_byte))

            byte_sequence.append(high_byte)

        if instruction_length == 2:
            pc += 1
            low_byte = bytes[pc]
            pc += 1
            high_byte = bytes[pc]

            # replace with new word
            instruction = instruction.replace(
                "hh", number_to_hex_byte(high_byte))
            instruction = instruction.replace(
                "ll", number_to_hex_byte(low_byte))

            # is the memory address within our own code?
            # then we should replace it with a label to that address
            absolute_address = (high_byte << 8) + low_byte
            if (absolute_address >= startaddr) & (absolute_address <= startaddr+end):
                instruction = instruction.replace("$", label_prefix)
                is_relative = True
                address = number_to_hex_word((high_byte << 8) + low_byte)

            # store the bytes - we might need them later
            byte_sequence.append(low_byte)
            byte_sequence.append(high_byte)

        if instruction_length == -1:
            instruction = "!byte $" + number_to_hex_byte(byte)

        line = {
            "a": memory_location_hex,
            "l": label,
            "b": byte_sequence,
            "i": instruction
        }

        # all relative/label data should get a new key so we can identify them
        # we need this when we cleanup unneeded labels
        if is_relative:
            line["rel"] = label_prefix + address

        if "ill" in opcode:
            line["ill"] = 1

        asm.append(line)
        pc = pc+1

    asm = remove_unused_labels(asm)
    return asm
Ok, drumroll, let's use this masterpiece on our latest program and disassemble the sh#t out of it!
; converted with disass6502 by awsm of mayday!

* = $0810
            ldy #$07

x0812
            tya
            sta $0400,y
            dey
            bne x0812
            rts
It works! It works! It works!
We're done, right? Right? Riiiiiggghhht??

Well, so far I've been doing happy path programming. Obviously my road to victory wasn't as flawless as I've demonstrated here (and it never is - don't ever assume that articles like this didn't require lots of trial and error and most of all buckets of WTFs). Our disassembler does work in many situations, but fails in the most important area.
Distinguishing code from data (part II)
Up until now, the disassembler lacks any smartness determining if a byte is a mnemonic or data. It just follows the rule that our program always starts with an instruction (which is actually a good assumption) and is followed by more instructions (which is a bad assumption). For programs that are code only (like the ones so far), we would indeed be done with our work and get a pretty reliable conversion. But, this is a rare case, as most of the time, data is an important part of any program. Let's ramp up the difficulty again and try something more common and complex at the same time.
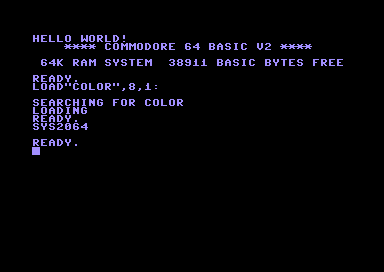
* = $0810

            lda #$00                ; the color value
            sta $d020               ; change background color
            sta $d021               ; change border color

            ldy #$0b                ; the string "hello world!" has 12 characters

loop
            lda hello,y             ; load character number y of the string
            sta $0400,y             ; save it at position y of the screen ram
            dey                     ; decrement y by 1
            bpl loop                ; is y positive? then repeat
            rts                     ; exit the program

hello       !scr "hello world!"     ; our string to display
Ahh, the classic "hello world!". Don't you hate it as much as I do? I would have loved to use a different text, but I'm pretty sure it's required by law to always include this in any tutorial. Glad we got this out of our way now. Our trusty breadbin would set the border and background colors to black and then write the text at the top left of the screen.
Let's feed our disassembler with the code and check the output.
; converted with disass6502 by awsm of mayday!

* = $0810
            lda #$00
            sta $d020
            sta $d021
            ldy #$0b

x081a
            lda x0824,y
            sta $0400,y
            dey
            bpl x081a
            rts

x0824
            php
            ora $0c
            nop $200f               ; $0c, $0f, $20
            slo $0f,x               ; $17, $0f
            jam                     ; $12
            nop $2104               ; $0c, $04, $21
Everything went smooth until we reached the data section with the "hello world!" string. Since we assume everything is code, all bytes got translated to mnemonics. Some of them are illegal opcodes, which I know from the opcodes.json. I use this information to display those bytes additionally as comments, marking these lines as... suspicious.

Making assumptions about code and data
It is actually impossible to be 100% certain if something is code or data. Even the computer wouldn't "know", it just executes instruction by instruction blindly. A jump to a memory location one byte before or after a valid instruction would likely result in a crash. The machine doesn't care. It's us damn humans who care. We want to read that nicely formatted code and make sense out of it.
However, there are some good indicators which can guide us through the conversion.
- The entry point always starts with code
- As long as no
jmporrtscommand is used, it's safe to assume we're still parsing code - The destination of absolute addressed
jmp,jsr, or relative branching instructions likely is code - The destination of absolute
ldaorsta(and similar mnemonics) likely is data
Other rules might apply, which I haven't added yet, if you happen to know any, let me know in the comments section. Of course these rules aren't waterproof either. The entry address could be the beginning of a BASIC starter like 10 sys 2064. Or - god forbid - the code is self modding.
At this point it made sense to refactor the code and start with a fresh approach.
Applying the ruleset
The new script generates very different data than before and I'm keeping in some information that might not be needed, but I'm still exploring this idea and it's useful to have as much data available as possible.
Let's go through the code again, byte by byte, with our rules documented in the comments
* = $0810

; lda #$00
A9                ; entry point. This must be code
00                ; byte is has to be part of the instruction
; sta $d020
8D                ; must be code as we haven't hit JMP or RTS or RTI yet
20                ; must be part of instruction
D0                ; must be part of instruction
; sta $d021
8D                ; must be code as we haven't hit JMP or RTS or RTI yet
21                ; must be part of instruction
D0                ; must be part of instruction
; ldy #$0b
A0                ; must be code as we haven't hit JMP or RTS or RTI yet
0B                ; must be part of instruction

; loop
; lda hello,y     ; must still be code, but also mark position "hello" as data!
B9                ; must be part of instruction
24                ; must be part of instruction
08                ; must be part of instruction
; sta $0400,y
99                ; must be code as we haven't hit JMP or RTS or RTI yet
00                ; must be part of instruction
04                ; must be part of instruction
; dey
88                ; must be code as we haven't hit JMP or RTS or RTI yet
; bpl loop
10                ; must be code as we haven't hit JMP or RTS or RTI yet
f7                ; must be part of instruction, but also mark branch destination (loop) as code!
; rts
60                ; must be code as we haven't hit JMP or RTS or RTI yet

; hello
; !scr "hello world!"
08                ; must be data since it was defined by the absolute lda earlier
05 0C 0C 0F 20 17 0F 12 0C 04 21    ; no rules apply, so defaults to code = 0 and data = 0
The generated data looks like this:
{'addr': 2064, 'byte': 'a9', 'dest': 0, 'code': 1, 'data': 0}
{'addr': 2065, 'byte': '00', 'dest': 0, 'code': 0, 'data': 0}
{'addr': 2066, 'byte': '8d', 'dest': 0, 'code': 1, 'data': 0}
{'addr': 2067, 'byte': '20', 'dest': 0, 'code': 0, 'data': 0}
{'addr': 2068, 'byte': 'd0', 'dest': 0, 'code': 0, 'data': 0}
{'addr': 2069, 'byte': '8d', 'dest': 0, 'code': 1, 'data': 0}
{'addr': 2070, 'byte': '21', 'dest': 0, 'code': 0, 'data': 0}
{'addr': 2071, 'byte': 'd0', 'dest': 0, 'code': 0, 'data': 0}
{'addr': 2072, 'byte': 'a0', 'dest': 0, 'code': 1, 'data': 0}
{'addr': 2073, 'byte': '0b', 'dest': 0, 'code': 0, 'data': 0}
{'addr': 2074, 'byte': 'b9', 'dest': 1, 'code': 1, 'data': 0}
{'addr': 2075, 'byte': '24', 'dest': 0, 'code': 0, 'data': 0}
{'addr': 2076, 'byte': '08', 'dest': 0, 'code': 0, 'data': 0}
{'addr': 2077, 'byte': '99', 'dest': 0, 'code': 1, 'data': 0}
{'addr': 2078, 'byte': '00', 'dest': 0, 'code': 0, 'data': 0}
{'addr': 2079, 'byte': '04', 'dest': 0, 'code': 0, 'data': 0}
{'addr': 2080, 'byte': '88', 'dest': 0, 'code': 1, 'data': 0}
{'addr': 2081, 'byte': '10', 'dest': 0, 'code': 1, 'data': 0}
{'addr': 2082, 'byte': 'f7', 'dest': 0, 'code': 0, 'data': 0}
{'addr': 2083, 'byte': '60', 'dest': 0, 'code': 1, 'data': 0}
{'addr': 2084, 'byte': '08', 'dest': 1, 'code': 0, 'data': 1}
{'addr': 2085, 'byte': '05', 'dest': 0, 'code': 0, 'data': 0}
{'addr': 2086, 'byte': '0c', 'dest': 0, 'code': 0, 'data': 0}
{'addr': 2087, 'byte': '0c', 'dest': 0, 'code': 0, 'data': 0}
{'addr': 2088, 'byte': '0f', 'dest': 0, 'code': 0, 'data': 0}
{'addr': 2089, 'byte': '20', 'dest': 0, 'code': 0, 'data': 0}
{'addr': 2090, 'byte': '17', 'dest': 0, 'code': 0, 'data': 0}
{'addr': 2091, 'byte': '0f', 'dest': 0, 'code': 0, 'data': 0}
{'addr': 2092, 'byte': '12', 'dest': 0, 'code': 0, 'data': 0}
{'addr': 2093, 'byte': '0c', 'dest': 0, 'code': 0, 'data': 0}
{'addr': 2094, 'byte': '04', 'dest': 0, 'code': 0, 'data': 0}
{'addr': 2095, 'byte': '21', 'dest': 0, 'code': 0, 'data': 0}
Parsing this data with the python function that constructs the assembly code results in a much better representation:
; converted with disass6502 by awsm of mayday!

* = $0810

            lda #$00
            sta $d020
            sta $d021
            ldy #$0b

l081a
            lda l0824,y
            sta $0400,y
            dey
            bpl l081a
            rts

l0824
            !byte $08
            !byte $05
            !byte $0c
            !byte $0c
            !byte $0f
            !byte $20
            !byte $17
            !byte $0f
            !byte $12
            !byte $0c
            !byte $04
            !byte $21
This assembly listing will now recompile without any errors and disassembling the binary PRG file again would reveal the exact same lines of code :)
It's time for a final test that includes everything we and our trusty disassembler have learned today. We mix code and data, jump to addresses and branch to other sections of the code.
* = $0810

            lda #$00                ; the color value
            sta $d020               ; change border color

            ldy #$0b                ; the string "hello world!" has 12 characters

loop
            lda hello,y             ; load character number y of the string
            sta $0400,y             ; save it at position y of the screen ram
            dey                     ; decrement y by 1
            bpl loop                ; is y positive? then repeat
            jmp exit                ; exit the program

hello       !scr "hello world!"     ; our string to display

exit
            lda $d020               ; load value from border color into A
            sta $d021               ; store A into background color
            rts
It's basically the same code as before, with an added jump to exit, which would be code after a data section. Let's see how the disassembler handles the final exam:
; converted with disass6502 by awsm of mayday!

* = $0810

            lda #$00
            sta $d020
            ldy #$0b

l0817
            lda l0823,y
            sta $0400,y
            dey
            bpl l0817
            jmp l082f

l0823
            !byte $08
            !byte $05
            !byte $0c
            !byte $0c
            !byte $0f
            !byte $20
            !byte $17
            !byte $0f
            !byte $12
            !byte $0c
            !byte $04
            !byte $21

l082f
            lda $d020
            sta $d021
            rts
Test completed. Mission accomplished! \o/

And here's the (very unoptimized) main python function used for the conversion. Not too much code I'd say, although a lot is outsourced into little helper functions to make the code more readable.
def analyze(startaddr, bytes, opcodes):
    bytes_table = generate_byte_array(startaddr, bytes)

    # JMP RTS RTI
    # used to default back to data for the following instructions
    default_to_data_after = ["4c", "60", "40"]

    # JMP JSR
    # used to identify code sections in the code
    abs_branch_mnemonics = ["4c", "20"]

    # LDA STA
    # used to identify data sections in the code
    abs_address_mnemonics = [
        "0d", "0e", "19", "1d", "1e", "2d", "2e", "39", "3d", "3e", "4d", "4e",
        "59", "5d", "5e", "6d", "6e", "79", "7d", "7e", "8c", "8d", "8e", "99", "9d,",
        "ac", "ad", "ae", "b9", "bc", "bd", "be", "cc", "cd", "ce", "d9", "dd", "de",
        "ec", "ee", "ed", "f9", "fd", "fe"
    ]

    # our entrypoint is assumed to be code
    is_code = 1
    is_data = 0

    i = 0
    end = len(bytes_table)

    while i < end:
        byte = bytes_table[i]["byte"]
        opcode = opcodes[byte]

        if bytes_table[i]["data"]:
            is_data = 1

        if bytes_table[i]["code"]:
            is_code = 1

        if is_code:
            bytes_table[i]["code"] = 1
            instruction_length = get_instruction_length(opcode["ins"])

            if byte in default_to_data_after:
                # we have a branching/jumping instruction, so we can't be sure anymore
                # about the following bytes being code
                is_code = 0

            if "rel" in opcode:
                # if the instruction is relative, we have to calculate the
                # absolute branching address to add a label later below
                destination_address = get_abs_from_relative(
                    bytes_table[i+1]["byte"], startaddr+i+1)

            if instruction_length == 2:
                # this is the absolute address
                destination_address = bytes_to_addr(
                    bytes_table[i+2]["byte"], bytes_table[i+1]["byte"])

            if byte in abs_branch_mnemonics or "rel" in opcode:
                if addr_in_program(destination_address, startaddr, startaddr + end):
                    # the hhll address must be code, so we mark that entry in the array
                    table_pos = destination_address - startaddr
                    bytes_table[table_pos]["code"] = 1
                    bytes_table[table_pos]["dest"] = 1

            if byte in abs_address_mnemonics:
                if addr_in_program(destination_address, startaddr, startaddr + end):
                    # the hhll address must be data, so we mark that entry in the array
                    table_pos = destination_address - startaddr
                    bytes_table[table_pos]["data"] = 1
                    bytes_table[table_pos]["dest"] = 1

            i += instruction_length
        i += 1
    return bytes_table
What's next
There's lots of room for improvements and the code could be much smarter and more elegant. But since I'm neither smart nor elegant either, I kinda feel in good company here. Also this article has already become the longest on my blog and the fact that you're still here, reading this, makes me question your life choices. Think about it. You should probably be outside right now, running after some butterflies or digging a whole in the ground leading to the center of the earth where Elvis lives with your mom.
Some ideas for further improvement would be:
- Add more smart rules. For example, in the last code example we use
ldy #$0bandlda hello,y, which could be identified so that the next0bbytes afterhelloare marked as data - a section of data bytes could be combined into single lines of code, e.g.
!byte $08, $05, $0c, $0c, $0f, $20, $17, $0f, $12, $0c, $04, $21 - typical byte patterns that represent often used instructions like
8D 20 0Dforsta $d020could be "weighted", meaning that while one could not be 100% sure it's code, we could be biased towards it being code. If we reach a certain threshhold of weight, we could mark something as either code or data - interaction with a proper UI. Turning this into JavaScript is pretty easy and we could let the user mark sections as either code or data and convert between both states on the fly. This is probably the biggest step towards a functional app
So that's it for now. Feel free to checkout the code on github, make changes to it and submit pull requests. This has been a fun learning experience for me. I still need to disassemble that Fairlight intro though...
Thank you for reading this article :)
Update (April 2021)
I was amazed to find this article on Hacker News shortly after posting and traffic spiked quite a bit because of that.
Since then these changes have been implemented:
- Added user defined entrypoints so that specific sections can be explicitly marked as either code or data. Useful in areas where the simple algorithm fails
- Added C64 memory addresses for automatic comments
- Code cleanup & a more robust command line interface